| Previous | Contents | Index |
To use the monitoring CGI, you must first configure the PMDF Service Dispatcher and PMDF HTTP server. That is done by running the Dispatcher configuration utility as described in the PMDF Installation Guide. If you have not configured the Dispatcher, then do so now.
Before connecting to the monitoring CGI, ensure that your web browser supports HTML tables and frames. Moreover, if you intend to use the JavaScript enhanced monitoring, also check that your browser supports JavaScript and that the JavaScript interpreter is enabled.4
To connect to the monitoring CGI with your web browser, open the URL
http://host:7633/monitor/ |
host, use the actual IP host name of
the system running the PMDF HTTP server. If you chose to run the PMDF
HTTP server on a port other than port 7633, then specify that port
number in place of 7633 in the above URL.
After opening the above URL, you will be presented with an initial explanatory page. From the bottom of that page, select either the JavaScript enhanced monitoring link or the normal monitoring link. Note that you may only see the normal monitoring link; if so, then your browser does not support JavaScript.
After you select the style of monitoring to perform, your browser window will split into multiple frames.
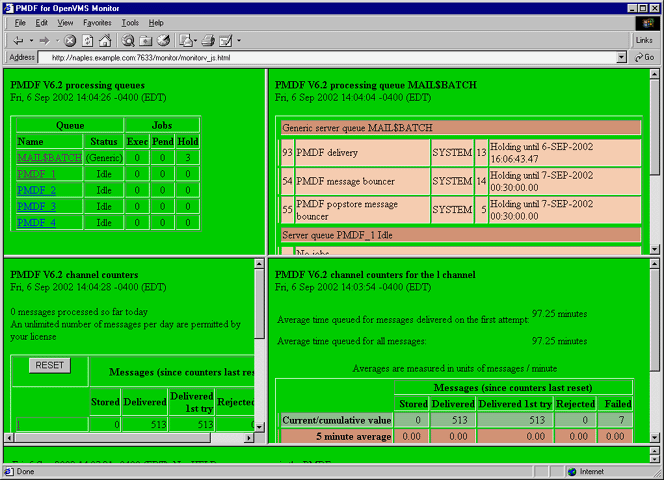
When monitoring OpenVMS PMDF platforms, five frames will appear,
+---------+---------+ | Frame 1 | Frame 2 | +---------+---------+ | Frame 3 | Frame 4 | +---------+---------+ | Frame 5 | +---------+---------+ |
+-------------+ | Frame 3 | +-------------+ | Frame 4 | +-------------+ | Frame 5 | +-------------+ |
| Frame 1: | All OpenVMS processing queues used by PMDF throughout the cluster. |
| Frame 2: | When you click on a link in Frame 1, the results appear in Frame 2. |
| Frame 3: | Channel counters for all your PMDF channels; cluster-wide on OpenVMS. |
| Frame 4: | When you click on a link in Frame 3, the results appear in Frame 4. |
| Frame 5: |
Warning about
.HELD messages; this frame only appears when using
JavaScript enhanced monitoring.
|
When JavaScript enhanced monitoring is used, the background colors of the individual frames will indicate whether or not a problem has been detected. For each frame, the background will be green when no problems are detected. When a problem is detected, the frame background will be red and the problem indicated in flashing text and called out with a burning trash can. Frame-by-frame, the problem criteria are as follows:
| Frame 1: | Red background if a queue is closed, disconnected, stalled, stopped, stopping, or has a stop pending, or if the periodic delivery job or message bouncer job is missing from the queues. |
| Frame 2: | Red background if a queue is closed, disconnected, stalled, stopped, stopping, or has a stop pending. |
| Frame 3: | Red background if the count of stored messages in a channel exceeds the threshold specified in the monitoring option file. See Section 31.7.2 for details. |
| Frame 4: | Red background if the count of stored messages in a channel exceeds the threshold specified in the monitoring option file. See Section 31.7.2 for details. |
| Frame 5: |
Red background if
.HELD message files are detected.
|
Figure 31-17 shows a sample of the web monitor display on OpenVMS.
Figure 31-17 Sample Web Monitor Display on OpenVMS
4 Do not confuse JavaScript with Java; they are two completely different scripting languages. Morever, if using Netscape Navigator, then you must use Navigator 3.0 or later; if using Microsoft Internet Explorer, then you must use Internet Explorer 3.0 or later.5 Owing to some Netscape Navigator 3.0 bugs, you may find that the frames are not actually updated. It's possible to get Navigator into a mode whereby it incorrectly updates frames from a client cache rather then from the remote server. For instance, resizing the frames can lead to this state. To correct this situation, clear Navigator's in-memory and on-disk caches with the Options, Network Preferences..., Cache menu. After clearing the caches, reload each frame one by one: select a frame and then select the View, Reload Frame menu item; repeat for the other frames. Do not reload the entire window as that will undo any adjustments made to the relative frame sizes. |
| Previous | Next | Contents | Index |