5. Serial Link Interfaces: PPP and SLIP
Introduction
This chapter describes the serial link interfaces available with TCPware. There are two types of serial link interfaces:
· Point-to-Point Protocol (PPP)
· Serial Line IP (SLIP)
Point-to-Point Protocol Interface
TCPware supports the Point-to-Point Protocol (PPP) so that you can send IP datagrams over serial links, including LAT or modem connections.
PPP is an enhancement to the nonstandard Serial Line IP (SLIP) interface (see Serial Line IP Interface). PPP provides self-contained error detection and automatically negotiated header compression. It also provides authentication through the Password Authentication Protocol (PAP) which you can set using PPPD command options.
You configure PPP on the TCPware host using the PPPD command and its options at the DCL prompt or aggregated in an options file. You do not need to configure PPP using the configuration procedure (CNFNET) or Network Control Utility (NETCU) commands.
Implementation
PPP is a standard (as Internet STD 51, or RFC 1661) for transporting multiprotocol datagrams over serial point-to-point links. PPP is composed of three parts:
· A method to encapsulate multiprotocol datagrams over serial links.
· An extensible Link Control Protocol (LCP) to establish, configure, and test the data link connection.
· A family of Network Control Protocols (NCPs, such as the IP Control Program and the authentication protocols) to establish and configure the different network layer protocols.
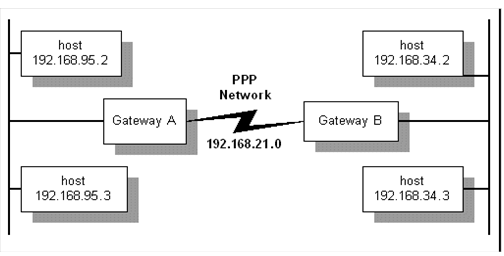
You need TCP/IP and application software at each end of the PPP link. One end can be TCPware, while the other end (known as the peer) can be any PPP client implementation. The below diagram shows a typical PPP network.
Because PPP lines are point-to-point connections, with TCPware you have the option to configure PPP lines as network lines or as unnumbered interface lines. The advantage to unnumbered interface lines is that you do not need to assign them IP addresses.
TCPware supports both dedicated and dialup PPP lines. PPP is common with line speeds from 14.4 to 28.8 kilobits per second (Kb/s).
PPP is implemented as a single program, PPPD, the PPP daemon, which runs as a foreign command. The daemon is a process that:
· Runs between the terminal driver and IP driver.
· Negotiates PPP line configuration with a peer PPP node.
· Establishes the PPP connection between the specified serial line and TCPware.
There is one PPPD process for each physical connection.
You control PPP through PPPD command line options, which you can add to an options file (TCPWARE:PPPOPTIONS.DAT).
Before Configuring PPP Lines
Before you begin configuring PPP lines:
· You must set the TTY_ALTYPAHD system parameter larger than its default value. This avoids losing characters. The higher the line speed, the higher you should set this parameter. For most applications, 1024 is appropriate.
TTY_ALTYPAHD is not a dynamic parameter. If you use SYSGEN to change it, you must reboot the system for the change to take effect.
· The MAXBUF system parameter must be at least twice the maximum transmission unit (MTU) of the PPP line plus 134. The default MTU for PPP lines is 1500 bytes; therefore, MAXBUF must be at least 3134. Increase MAXBUF if necessary. MAXBUF is dynamic. If you use SYSGEN to change it, you do not need to reboot the system for the change in value to take effect.
· Determine the speed of your serial line or modem. You may need to specify this line speed as a PPPD command parameter.
· Make sure that the terminal device you specify is allocated to your current process.
PPPD Command
You configure PPP lines on your local system using the PPPD command at the DCL prompt and specifying the appropriate options. You start PPPD as a foreign command as follows:
$ PPPD :== $TCPWARE:PPPD.EXE
$ PPPD options
When you start PPPD, it either begins sending PPP packets to the specified terminal device to start negotiating, or waits for PPP packets to arrive, depending on the options specified on the command line. When negotiation is complete and IP is up, you can tell if the PPP device is configured by using the NETCU command SHOW NETWORK:
$ NETCU SHOW NETWORK
TCPware(R) for OpenVMS
Internet Network Information:
Line Local Address Subnet Mask MTU Xmits Errs Recvs Errs RBU
---- ------------- ----------- --- ----- ---- ----- ---- ---
PPP-0 192.168.142.57 255.255.255.0 1500 1 0 1 0 0
LPB-0 127.0.0.1 255.0.0.0 64512 74 0 74 0 0
...
The PPP line shows up as PPP-n, the n starting with 0 and incrementing for each new line.
A PPP session is terminated in one of the following ways:
· If you enter the NETCU STOP/IP command for the PPP line
· The peer terminates the PPP session
· The serial line is hung up (for modem lines)
· The PPPD process is stopped
The PPPD process either ends or listens on the line for more incoming PPP packets, depending on the command line option used. PPP also ends when it cannot agree on the option negotiation during startup.
By default, PPPD creates a detached process to which it hands over the terminal device. To execute PPPD in foreground mode, use the -DETACH (or -NODETACH) option with the PPPD command. (Note that special privileges apply to a detached process. See the -DETACH option in the PPPD command reference for details.) The name of the detached process is PPP_terminal-device-name.
The TCPWARE:PPPOPTIONS.DAT file can contain any option you can specify on the PPPD command line. Options in the file have precedence over the options on the command line. The options file can contain any of the PPPD options, separated with spaces or tabs. You can specify options in multiple lines, as in the following example:
NETMASK 255.255.252.0 ASYNCMAP 0
NAME FLOWERS.EXAMPLE.COM
AUTH +PPP
You can specify command files in four different PPPD options, as described in the below table.
|
Option |
Description |
|
CONNECT file |
Sets the terminal device through the specified command file |
|
DISCONNECT file |
Resets the terminal device through the specified command file |
|
IPUP file |
The specified file executes when IP is started over PPP |
|
IPDOWN file |
The specified file executes when IP over PPP is shut down |
The command file associated with the CONNECT and DISCONNECT options must return an exit status to PPPD with the EXIT command. PPPD waits for the script to finish and terminates if the return status is not successful (the status code is an odd number). The command files are provided with the device name as the P1 parameter. You can use a dialup scripting program such as KERMIT.
The IPUP and IPDOWN options are executed asynchronously so that PPPD does not wait for their completion. They are provided with the following command parameters:
|
Parameter |
Description |
|
P1 |
Interface name (such as PPP-0) |
|
P2 |
Terminal device (such as _TTA3:) |
|
P3 |
Local IP address |
|
P4 |
Remote IP address |
|
P5 |
(Optional) String specified with the IPPARAM option |
Configuring PPP Links
The PPPD command line parameter and options shown in the below table control the PPP link configuration and specify the basic characteristics of the PPP link.
|
Option |
Description |
|
device-name |
Terminal device, such as TTA3 |
|
ASYNCMAP map |
Bit map of characters to escape |
|
CRTSCTS |
Uses hardware flow control |
|
ESCAPE xx,yy,... |
Escape character definitions |
|
MRU n |
Maximum Receive Unit (MRU) |
See the Command Reference section in this chapter for details on each option.
By default, PPPD starts sending out configuration requests to the peer to establish a connection, and terminates when the connection shuts down, negotiation fails, or the peer does not respond within a set timeout period. You can change this course of action using the options shown in the below table.
|
Option |
Description |
|
PASSIVE |
Initiates negotiation but waits passively for the peer to respond if that fails |
|
SILENT |
Passively waits until the PPP packet arrives |
|
PERSIST |
After the PPP connection is terminated, waits for a new connection without exiting (in the case of a dial-out, reestablishes the connection by redialing) |
Authentication
PPPD provides sufficient access control. You can provide legitimate users PPP access to a server machine, without fear of compromising the security of the server or the network it is on. This access control is available as a combination of the following:
· The TCPWARE:PPPOPTIONS.DAT file, where you can place options to require authentication when running PPPD.
· Password Authentication Protocol (PAP) secrets files where you can restrict the set of IP addresses for individual users
PPPD's default action is to agree to authenticate if requested, and not to require authentication from the peer. However, PPPD does not agree to authenticate itself with a particular protocol if it has no secrets it can use to do so.
You can change this behavior with the command line options shown in the below table:
|
Option |
Description |
|
AUTH |
Peer authenticates (any authentication) |
|
+PAP |
Peer authenticates with PAP |
|
-PAP |
Do not agree to authenticate with PAP |
Using the Password Authentication Protocol
The Password Authentication Protocol (PAP) provides a simple method for the peer to establish its identity. PAP uses a two-way handshake with a simple name and password combination. This handshake occurs only on establishing the initial PPP link.
PAP is not a strong authentication method. Passwords go over the circuit as clear text, and there is no protection from playback or repeated trial and error attacks.
|
Note: You can optionally authenticate using the user/password combination in the OpenVMS UAF file by option login.
|
Using the Challenge Handshake Authentication Protocol
The Challenge Handshake Authentication Protocol (CHAP) is a stronger method than PAP of authenticating the PPP link, and is the preferred method. A CHAP secret (password) is encrypted, and you can repeat authentication periodically during the session using different challenge values.
Authentication Files
Authentication information is stored in the TCPWARE:PPPPAP.DAT file for PAP authentication or the TCPWARE:PPPCHAP.DAT file for CHAP authentication. The contents of these files are used both for authenticating incoming peer hosts and authenticating the local host to remote peers. You can use the TCPWARE:PPPSECRET.TEMPLATE file as a template for both, since the format for both is identical.
The following example shows a PPP.DAT entry that authenticates the local host to a peer:
# TCPWARE:PPP.DAT
#
# local/user name server name secret/password [address restriction]
# --------------- ----------- --------------- ---------------------
skat lear SecretString 198.168.142.57
Both files are multi-columned text files. Comment lines in PPP.DAT start with the pound sign (#). Each line consists of three fields with additional optional fields, as follows:
field1 field2 field3 optional-fields
White space separates the fields. You can use the asterisk (*) wildcard in the first and second fields. Optional fields can contain lists of authorized peer IP addresses. If the optional field is omitted, any IP address is allowed.
The fields have different meanings for PAP and CHAP authentication, and its direction, as given in the below table:
|
PAP authentication of incoming peer: |
|||
|
field1 local-username |
field2 peer-hostname |
field3 user-password |
optional |
|
PAP authentication of local host to peer: |
|||
|
field1 peer-username |
field2 peer-hostname |
field3 user-password |
optional |
|
CHAP authentication of local host to peer: |
|||
|
field1 peer-hostname |
field2 local-hostname |
field3 CHAP-secret-string |
optional
|
|
field1 local-hostname |
field2 peer-hostname |
field3 CHAP-secret-string |
optional |
Modifying Authentication Names
You can use several PPPD command line options to modify names used in authentication. These options are shown below:
|
Option |
Description |
|
DOMAIN d |
Appends the domain name d to the local hostname |
|
NAME n |
Sets the local hostname to n |
|
REMOTENAME n |
Sets the assumed remote hostname to n |
|
USEHOSTNAME |
Uses the system-specified local host name |
|
USER u |
Sets the username to u for PAP |
IP Addresses
The parameter and options shown below are related to configuring IP addresses.
|
Parameter or option |
Description |
|
local-IP-address:remote-IP-address |
Local and remote IP addresses; either can be omitted |
|
-IP |
Disables IP address negotiation |
|
NETMASK n |
Sets the interface mask to n |
|
NOIPDEFAULT |
Disables use of the local IP address as the default |
It is usually not necessary to specify the IP addresses. By default, each peer uses its default IP address if it knows it.
Incoming Dialup Lines
Perform these steps to set up an incoming dialup PPP line:
1. Create a login account for the PPP site using the OpenVMS AUTHORIZE utility. This should be a captive account and must have OPER privileges.
2. Create a LOGIN.COM file for this account. The TCPWARE:PPPLOGIN.TEMPLATE file is available. Below is a sample LOGIN.COM file for an unnumbered interface:
$ ON WARNING THEN
LOGOUT
$ IF (F$TRNLNM("TCPWARE_NETCP_MBX") .EQS. "") THEN GOTO
NOTCPWARE
$ PPPD :== $TCPWARE:PPPD
$ TT = F$TRNLNM("TT")
$ WRITE SYS$OUTPUT "Starting PPP..."
$ DEFINE/USER SYS$ERROR NLA0:
$ DEFINE/USER SYS$OUTPUT NLA0:
$ PPPD PROXYARP :192.168.95.12 'TT' -DETACH
$ WRITE SYS$OUTPUT "Shutting down PPP..."
$ EXIT
$ NOTCPWARE:
$ WRITE SYS$OUTPUT "%PPP-F-NOTACT, TCPware not active"
$ LOGOUT
Once you set up the account and login file, the remote site dials the OpenVMS system and logs in as the PPP user to establish the connection. The login command file automatically configures the PPP line.
Create a separate account and LOGIN.COM file for each remote PPP site.
|
Note: Unlike TCPware's SLIP implementation, this account can remain logged in during the PPP session. You can use ordinary OpenVMS user accounting to charge the user for the PPP connection. If you prefer to free up login sessions, you can remove the -DETACH option.
|
Routing
The options shown below are related to configuring routes.
|
Option |
Description |
|
DEFAULTROUTE |
Uses the remote host as the default gateway |
|
-IP |
Disables IP address negotiation |
|
NETMASK n |
Sets the interface mask to n |
|
PROXYARP |
Starts the line as an unnumbered interface and enables proxy ARP |
|
-PROXYARP |
Disables proxy ARP |
Traditional Numbered Interfaces
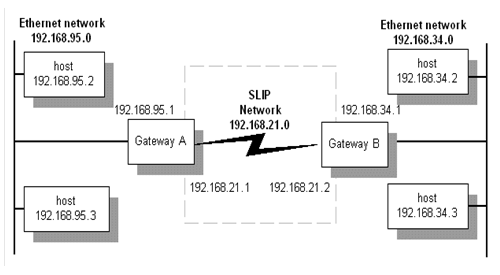
The below diagram shows a sample internet consisting of three networks: Ethernet network 192.168.95.0, PPP network 192.168.21.0, and Ethernet network 192.168.34.0.

Each gateway has an internet address for each network to which it connects. In this example, PPP network 192.168.21.0 is set up so that networks 192.168.95.0 and 192.168.34.0 can communicate.
Initiate the PPP link from local host 192.168.95.1 to peer 192.168.34.1 as follows:
$ PPPD 192.168.21.1:192.168.21.2 NETMASK 255.255.255.0 TTA2
Perform a similar command on local host 192.168.34.1. You must also set up routing through the established connection. To do so in this setup, create a command file with the following contents for Gateway B, and use the PPPD IPUP option to specify the command file:
$ RUN TCPWARE:NETCU ADD ROUTE 192.168.34.0 192.168.21.1 /NETWORK /GATEWAY
Unnumbered Interfaces
In the case of a single host connection over a PPP line to a network, you may not be able to dedicate a separate network number to the connection. This requires you to use an unnumbered interface. The below diagram shows such a scenario.
Here is how you would set up the connection on host 192.168.34.1:
$ PPPD 192.168.34.1:192.168.34.4 NETMASK 255.255.255.0 PROXYARP TTA2
The PROXYARP option lets host 192.168.34.1 respond to Address Resolution Protocol (ARP) requests for the remote host's address. In this way, other hosts on the 192.168.34.0 network can send any packets addressed to 192.168.34.2. This is known as "proxy ARP" and keeps you from having to add the host routes on all other hosts in network 192.168.34.0.
The PROXYARP option does the following:
· Starts the PPP interface as unnumbered
· Enables proxy ARP for the remote node
· Adds a host route to the remote node through the PPP interface
TCP/IP Header Compression
PPPD also provides the option to compress TCP/IP headers using the Van Jacobson (VJ) header compression algorithm. Compression is enabled unless you for some reason want to disable it. The options shown below are related to TCP/IP header compression.
|
Option |
Description |
|
-VJ |
Disables VJ compression |
|
-VJCCOMP |
Disables VJ Connection ID compression |
|
VJ-MAX-SLOTS n |
Sets the number of VJ connection slots to n |
Command Reference
The following pages include the command reference for the PPPD command. The options include parameters and options (some with arguments). Parameters and options are listed alphabetically.
Frequently used parameters and options include:
PPPD
Provides the basic Link Control Protocol (LCP), authentication support, and a Network Control Protocol (NCP) for establishing and configuring the IP Control Protocol (IPCP). Parameters and options are listed alphabetically for reference.
Requires OPER and PHY_IO privileges. Requires READALL privilege if secret files are used. Requires TMPMBX, DETACH, and SHARE privileges for running in detached mode.
Format
PPPD [parameters | options]
Parameters
device-name
Communicates over the named device. If no device name is given, or the name of the controlling terminal is given, PPPD uses the controlling terminal.
local-IP-address:remote-IP-address
Sets the local or remote interface IP addresses. Either one may be omitted. The IP addresses can be specified with a hostname or in decimal dot notation (such as 150.234.56.78). The default local address is the (first) IP address of the system (unless the NOIPDEFAULT option is given). The remote address is obtained from the peer if not specified in any option. Thus, in simple cases, this option is not required. If a local and/or remote IP address is specified with this option, PPPD does not accept a different value from the peer in the IPCP negotiation, unless the IPCP-ACCEPT-LOCAL or IPCP-ACCEPT-REMOTE options are given, respectively.
Options
-AC
Disables address/control compression negotiation (default).
-ALL
Disables requesting or allowing negotiation of any options for LCP and IPCP (uses the default values).
-AM
Disables ASYNCMAP negotiation (uses the default ASYNCMAP, which is to escape all control characters).
ASYNCMAP map
-AS map
Sets the async character map to map, which describes which control characters cannot be successfully received over the serial line. The peer is requested to send these characters as a two-byte escape sequence. The argument is a 32-bit hex number with each bit representing a character to escape. Bit 0 (00000001) represents the character 0x00; bit 31 (80000000) represents the character 0x1f (Ctrl/_). If multiple ASYNCMAP options are given, the values are OR’d together. If no ASYNCMAP option is given, no async character map will be negotiated for the receive direction; the peer should then escape all control characters.
AUTH
Requires the peer to authenticate itself before allowing network packets to be sent or received.
CONNECT command-file
Uses a DCL command file to set up the serial line. If used with -D, debug output is logged in the command-file.LOG file.
CRTSCTS
Uses hardware flow control (RTS/CTS) to control the flow of data on the serial port. If you use neither CRTSCTS nor -CRTSCTS, the hardware flow control setting for the serial port is unchanged.
-CRTSCTS
Disables hardware flow control (RTS/CTS) on the serial port. If you use neither CRTSCTS nor -CRTSCTS, the hardware flow control setting for the serial port is unchanged.
DEBUG
-D
Enables debugging.
DEFAULTROUTE
Adds a default route to the system routing tables, using the peer as the gateway, when IPCP negotiation is successfully completed. This entry is removed when the PPP connection breaks.
-DEFAULTROUTE
Disables the defaultroute option. If you want to prevent users from creating default routes with PPPD, place this option in the TCPWARE:PPPDOPTIONS.DAT file.
-DETACH
-NODETACH
Executes PPPD in foreground mode. Normally, PPPD creates a detached process to which it hands over the terminal device. To start in detached mode, PPPD requires the DETACH privilege, along with TMPMBX and SHARE privileges if you are using your login device as a PPP device. -DETACH and -NODETACH are identical.
DISCONNECT command-file
Runs the DCL command file after PPPD terminates the link. This command file could issue commands to the modem to hang up, if hardware modem control signals were not available. If used with -D, debug output is logged in the command-file.LOG file.
DNS address
Identifies the primary Domain Name System (DNS) name server. If omitted, PPPD uses the first name server specified by the TCPWARE_NAMESERVERS logical, set up through the DNS configuration.
DOMAIN d
Appends the domain name d to the local host name for authentication purposes. For example, if gethostname() returns the name IRIS, but the fully qualified domain name is IRIS.EXAMPLE.COM, you would use the DOMAIN option to set the domain to EXAMPLE.COM.
ESCAPE xx,yy,...
Escapes the specified characters on transmission (regardless of whether the peer requests them to be escaped with its async control character map). Specify the characters to be escaped as a list of hex numbers separated by commas. Note that you can specify almost any character for the ESCAPE option, unlike the ASYNCMAP option that only lets you specify control characters. The characters that cannot be escaped are those with hex values 0x20 through 0x3f, and 0x5e.
FILE file
Reads options from a file.
-IP
Disables IP address negotiation. If used, you must specify the remote IP address with an option on the command line, or in the TCPWARE:PPPOPTIONS.DAT file.
IPCP-ACCEPT-LOCAL
Accepts the peer's interpretation of the local IP address, even if the local IP address was specified in an option.
IPCP-ACCEPT-REMOTE
Accepts the peer's interpretation of its (remote) IP address, even if the remote IP address was specified in an option.
IPCP-MAX-CONFIGURE n
Sets the maximum number of IPCP configure-request transmissions to n (default 10).
IPCP-MAX-FAILURE n
Sets the maximum number of IPCP configure-NAKs returned before starting to send configure-Rejects instead to n (default 10).
IPCP-MAX-TERMINATE n
Sets the maximum number of IPCP terminate-request transmissions to n (default 3).
IPCP-RESTART n
Sets the IPCP restart interval (retransmission timeout) to n seconds (default 3).
IPPARAM string
Provides an extra parameter to the IPUP and IPDOWN command file scripts. If used, the string supplied becomes the fifth parameter to those scripts.
IPUP command-file
Executes the specified command file when IP over PPP starts up, asynchronously, so that PPPD does not wait for the file's completion. Provided with the following command parameters:
|
Command Parameter |
Description |
|
P1 |
Interface name (such as PPP-0) |
|
P2 |
Terminal device (such as _TTA3:) |
|
P3 |
Local IP address |
|
P4 |
Remote IP address |
|
P5 |
(Optional) String specified with the IPPARAM option |
If used with -D, debug output is logged in the command-file.LOG file.
IPDOWN command-file
Executes the specified file when IP over PPP shuts down, asynchronously, so that PPPD does not wait for the file's completion. Provided with the following command parameters:
|
Command Parameter |
Description |
|
P1 |
Interface name (such as PPP-0) |
|
P2 |
Terminal device (such as _TTA3:) |
|
P3 |
Local IP address |
|
P4 |
Remote IP address |
|
P5 |
(Optional) String specified with the IPPARAM option |
If used with -D, debug output is logged in the command-file.LOG file.
KDEBUG n
Enables debugging of the low-level interface with the IP and terminal driver. The argument n is a number that is the sum of the following values:
|
Value |
Description |
|
1 |
Enable general debug messages |
|
2 |
Request that the contents of received PPP packets be printed |
|
4 |
Request that the contents of transmitted PPP packets be printed |
|
8 |
Request that raw data be received from the serial device |
|
16 |
Request that raw data be transmitted to the serial device |
LCP-ECHO-FAILURE n
Presumes the peer is dead if n LCP echo-requests are sent without receiving a valid LCP echo-reply. If this happens, PPPD terminates the connection. Requires a non-zero value for the LCP-ECHO-INTERVAL parameter. Use this option to enable PPPD to terminate after the physical connection breaks (such as when the modem hangs up) in situations where no hardware modem control lines are available.
LCP-ECHO-INTERVAL n
Sends an LCP echo-request frame to the peer every n seconds. Normally the peer should respond to the echo-request by sending an echo-reply. You can use this option with the LCP-ECHO-FAILURE option to detect when the peer is no longer connected.
LCP-MAX-CONFIGURE n
Sets the maximum number of LCP configure-request transmissions to n (default 10).
LCP-MAX-FAILURE n
Sets the maximum number of LCP configure-NAKs returned before starting to send configure-Rejects instead to n (default 10).
LCP-MAX-TERMINATE n
Sets the maximum number of LCP terminate-request transmissions to n (default 3).
LCP-RESTART n
Sets the LCP restart interval (retransmission timeout) to n seconds (default 3).
LOGIN
Uses the system password database for authenticating the peer using PAP.
-MN
Disables magic number negotiation. With this option, PPPD cannot detect a looped-back line.
MRU n
Sets the MRU (Maximum Receive Unit) value to n for negotiation. The peer is requested to send packets of no more than n bytes. The minimum value is 128 and the default is 1500; 296 is recommended for slow links (40 bytes for the TCP/IP header plus 256 bytes of data).
-MRU
Disables MRU negotiation. PPPD uses the default MRU value of 1500 bytes.
MTU n
Sets the MTU (Maximum Transmit Unit) value to n. Unless the peer requests a smaller value through MRU negotiation, PPPD requests that the IP layer send data packets of no more than n bytes through the PPP network interface.
NAME n
Sets the name of the local system for authentication purposes to n.
NBDNS address
Identifies the primary NetBIOS name server.
NETMASK n
Sets the interface netmask to n, a 32-bit netmask in "decimal dot" notation (such as 255.255.252.0).
NOIPDEFAULT
Disables the default action when no local IP address is specified, which is to determine (if possible) the local IP address from the hostname. With this option, the peer must supply the local IP address during IPCP negotiation (unless you explicitly specify it on the command line, or in the TCPWARE:PPPDOPTIONS.DAT file).
+PAP
Requires the peer to authenticate itself using PAP.
-PAP
Disables authentication using PAP.
PAP-MAX-AUTHREQ n
Sets the maximum number of PAP authenticate-request transmissions to n (default 10).
PAP-RESTART n
Sets the PAP restart interval (retransmission timeout) to n seconds (default 3).
PAP-TIMEOUT n
Sets the maximum time that PPPD waits for the peer to authenticate itself with PAP to n seconds (0 means no limit).
PASSIVE
-P
Enables the "passive" option in the LCP. With this option, PPPD attempts to initiate a connection; if it does not receive a reply from the peer, it waits passively for a valid LCP packet from the peer (instead of exiting, as it does without this option).
-PC
Disables protocol field compression negotiation (the default).
PERSIST
Disables exiting after a connection is terminated. Instead, tries to reopen the connection.
PROXYARP
Adds an entry to this system's ARP (Address Resolution Protocol) table with the IP address of the peer and the Ethernet address of this system. This also starts the PPP interface as an unnumbered interface.
-PROXYARP
Disables the PROXYARP option. If you want to prevent users from creating proxy ARP entries with PPPD, place this option in the TCPWARE:PPPDOPTIONS.DAT file.
REMOTENAME n
Sets the assumed name of the remote system for authentication purposes to n.
SDNS address
Identifies the secondary DNS name server. If omitted, PPPD uses the first name server specified by the TCPWARE_NAMESERVERS logical, set up through Domain Name Services configuration.
SILENT
Disables transmitting LCP packets to initiate a connection until a valid LCP packet is received from the peer.
SNBDNS address
Identifies the secondary NetBIOS name server.
USEHOSTNAME
Enforces the use of the hostname as the name of the local system for authentication purposes (overrides the NAME option).
USER u
Sets the username to use to authenticate this machine with the peer using PAP to u.
-VJ
Disables negotiation of Van Jacobson style TCP/IP header compression (the default is to negotiate TCP/IP header compression).
-VJCCOMP
Disables the connection-ID compression option in Van Jacobson style TCP/IP header compression. With this option, PPPD does not omit the connection-ID byte from Van Jacobson compressed TCP/IP headers, nor request the peer to do so.
VJ-MAX-SLOTS n
Sets the number of connection slots to be used by the Van Jacobson TCP/IP header compression and decompression code to n, which must be between 2 and 16 (inclusive).
Troubleshooting PPPD
PPPD provides two types of debugging information:
· Trace output to SYS$OUTPUT
· OPCOM messages
By default, PPPD generates OPCOM messages for fatal errors, such as a failure to open the IP interface or insufficient privileges. In normal running operation, you should not see any OPCOM message. If you have a problem getting PPPD to work, first search for the OPCOM messages for PPPD.
You can also specify the DEBUG option. This enables the PPPD process to print out informational messages to SYS$OUTPUT. Define SYS$OUTPUT to the appropriate log file before invoking the PPPD server (or you can invoke PPPD interactively and output to the terminal). You must specify -DETACH to use this option.
When you specify the DEBUG (or -D) option, it debugs at level 5, which is to display up to warning and significant events. For more informational and debugging information, you can raise the debug level up to 7 by defining the logical TCPWARE_PPPD_DEBUG_LEVEL.
For a detached process, or if you prefer, you can also raise the message level for OPCOM messages. By default, it is set to 4 to report fatal and error messages. You may want to raise it to 5 to monitor the significant events in PPPD, or even higher for more detail by defining the logical TCPWARE_PPPD_OPCOM_LEVEL.
If you get the OPCOM messages:
%TCPware_PPPD-E-setting terminal
device failed with error 0x2C4 %TCPware_PPPD-E-PPP device initialization failed
with error 0x2C4
%SYSTEM-F-DEVACTIVE, device is active,
Make sure that the device-name indicated on the PPPD command line is allocated to the current process before starting PPPD.
Serial Line IP Interface
Use serial Line IP (SLIP) when you need to route TCP/IP traffic over a serial line instead of an Ethernet cable. You most commonly use SLIP to connect systems on two Ethernet networks some distance apart.
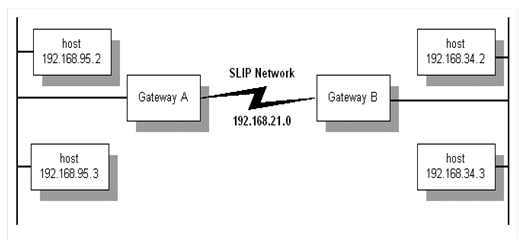
You need TCP/IP and application software at each end of the SLIP link. One end can be TCPware, while the other end can be a SLIP implementation such as HP-UX or Linux. The below diagram shows a typical SLIP network.
Because SLIP lines are point-to-point connections, with TCPware you have the option to configure SLIP lines as network lines or as unnumbered interface lines.
TCPware supports both dedicated and dialup SLIP lines. Configure dedicated (hard-wired) SLIP lines during network configuration. Configure dialup SLIP lines as you need them, as described in this chapter. SLIP is common with line speeds from 1200 bits per second (bps) to 19.2 Kbps.
NETCP (not IPDRIVER) does the I/O to the terminal device to send and receive datagrams. NETCP uses the IPDRIVER External Interface to do this.
SLIP Line Identification
You can use any standard OpenVMS terminal device as a SLIP line. Unlike other line ID controller numbers, the SLIP line ID is not related to the actual device name. CNFNET prompts you for the actual device name during TCPware configuration.
The START/IP command line-specific-information parameter provides the OpenVMS device name for the SLIP line. If you omit this parameter, TCPware assumes that the TCPWARE_SLIP_n system logical (where n is the controller number) defines the device.
The maximum number of SLIP lines you can configure for one TCPware host is 256. You can define lines SLIP-0 through SLIP-255. If you try to define a SLIP line with a larger number in CNFNET, the message %TCPWARE_CNFNET-E-INVLINE, invalid line appears.
Before Configuring SLIP Lines
Before you begin configuring SLIP lines:
· You must set the TTY_ALTYPAHD system parameter larger than its default value. This avoids losing characters. The higher the line speed, the higher you should set this parameter. For most applications, 1024 is appropriate.
TTY_ALTYPAHD is not a dynamic parameter. If you use SYSGEN to change it, you must reboot the system for the change to take effect.
· The MAXBUF parameter must be at least twice the maximum transmission unit (MTU) of the SLIP line, plus 144. The default MTU for SLIP lines is 1006 bytes; therefore, MAXBUF must be at least 2156. Increase MAXBUF if necessary. MAXBUF is dynamic. If you use SYSGEN to change it, you do not need to reboot the system for the change in value to take effect.
Configuring SLIP Lines
To configure TCPware for SLIP:
1. If you plan to use a dedicated SLIP line, enter its line ID, host name, internet address, and terminal device name in response to the applicable prompts in CNFNET.
You can use any valid OpenVMS terminal device as a SLIP line. CNFNET prompts you for the actual device name. Make sure that the network number portion of the SLIP line's internet address is unique if you use the /UNNUMBERED interface flag.
2. For dedicated SLIP lines, you may want to create the TCPWARE:SLIP_SETUP.COM file. The network startup command procedure (TCPWARE:STARTNET) executes this command procedure, if it exists, before using the SLIP lines.
SLIP_SETUP.COM should contain the commands necessary to configure the terminal devices for proper operation. Typically, it would include SET TERMINAL commands to set the baud rate and other terminal characteristics.
3. For SLIP line speeds higher than 1200 bps, enable the alternate type-ahead buffer (ALTYPEAHD) characteristic for the terminal. Enter the following command for each SLIP terminal at the DCL prompt or in the SLIP_SETUP.COM file:
SET TERMINAL /ALTYPEAHD /PERMANENT device
4. For both dedicated and dialup SLIP lines, set up routing information so that TCP/IP traffic routes properly over the SLIP link. The SLIP link should either have a unique network number or be unnumbered.
You can give TCPware routing information either in the Network Control Utility (NETCU), by editing the TCPWARE:ROUTING.COM file to include appropriate NETCU commands, or through GATED. For example, enter the following commands on each SLIP terminal at the DCL prompt or in the SLIP_SETUP.COM file (for dedicated lines):
ADD ROUTE /NETWORK network-address /GATEWAY gateway-address
ENABLE FORWARDING
NETCU entries remain active until TCPware shuts down. Updating the ROUTING.COM file with these commands makes them permanent. Do not use this method if using GateD to configure routes. To use GateD to configure routes, include a static statement for each of the routes in the TCPWARE:GATED.CONF file. (See the next section.)
Sample SLIP Link
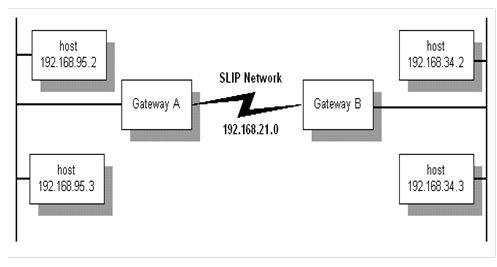
The below diagram shows a sample internet consisting of three networks: Ethernet network 192.168.95.0, SLIP network 192.168.21.0, and Ethernet network 192.168.34.0.
Each gateway has an internet address for each network to which it connects. In this example, you can do the following to set up SLIP network 192.168.21.0 so that networks 192.168.95.0 and 192.168.34.0 can communicate:
· At each TCPware host in network 192.168.95.0 (on the Gateway A side), set the local gateway host address:
· Do the same for each host in network 192.168.34.0 (on the Gateway B side):
SET GATEWAY 192.168.34.1
· At Gateway A, add the route through Gateway B's SLIP network address:
ADD ROUTE /NETWORK 192.168.34.0 /GATEWAY 192.168.21.2
· At Gateway B, add the route through Gateway A's SLIP address:
ADD ROUTE /NETWORK 192.168.95.0 /GATEWAY 192.168.21.1
ENABLE FORWARDING
|
Note: You can also define the default gateway by responding to prompts during the network configuration procedure. See Chapter 3, Configuring the TCP/IP Core Environment, in the TCPware Installation & Configuration Guide.
|
You can also configure the SLIP route using GateD. Include the following statements in the GATED.CONF files instead of the ADD ROUTE commands in ROUTING.COM:
static
{ 192.168.34.0 gateway 192.168.21.2 ;} ;
static
{ 192.168.95.0 gateway 192.168.21.1 ;} ;
Sample Unnumbered SLIP Link
In the case of a single host connection over a SLIP line to a network, you may not be able to dedicate a separate SLIP address to the connection on the network end. This requires you to use an unnumbered interface. The below diagram shows such a scenario.
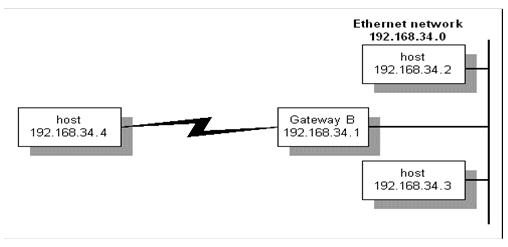
Here is how you would set up the connection on host 192.168.34.4:
SET GATEWAY 192.168.34.1
Here is how you would set up the connection at Gateway B for host 192.168.34.2:
START/IP /UNNUMBERED SLIP-0
192.168.34.1
ADD ROUTE 192.168.34.4 SLIP-0
ENABLE FORWARDING /ARP
You need the /UNNUMBERED qualifier with the START/IP command. The ENABLE FORWARDING command with the /ARP qualifier lets host 192.168.34.1 respond to Address Resolution Protocol (ARP) requests for the remote host's address. In this way, other hosts on the 192.168.34.0 network can send any packets addressed to new-remote-ip-addr to Gateway B. This is known as "proxy ARP" and keeps you from having to add the host route on all other hosts in network 192.168.34.0.
You can also set up unnumbered interfaces on both ends of the SLIP connection. You must use ENABLE FORWARDING, but you cannot use proxy ARP with unnumbered interfaces, and you have to add routes on all other nodes in the network.
Incoming Dialup SLIP Lines
Perform these steps to set up an incoming dialup SLIP line:
1. Create a login account for the SLIP site using the OpenVMS AUTHORIZE utility. This should be a captive account and must have either OPER privilege or have been granted the TCPWARE_CONTROL rights identifier. TCPWARE_CONTROL requires the software password file, PSW_*.DAT, to have at least read access for the TCPWARE_CONTROL rights identifier.
2. Create a LOGIN.COM file for this account. A template file is available in TCPWARE:SLIPLOGIN.COM. The below example shows an unnumbered interface example.
In the example, a user is dialing in from a PC configured to use an address of 192.168.95.124. The Ethernet interface on the OpenVMS system is configured with an address of 192.168.95.12.
$ ON WARNING THEN LOGOUT
$ IF (F$TRNLNM("TCPWARE_NETCP_MBX") .EQS. "") THEN GOTO
EXIT
$ NETCU := $TCPWARE:NETCU
$ TT = F$TRNLNM("TT")
$ DEFINE/USER SYS$ERROR NLA0:
$ DEFINE/USER SYS$OUTPUT NLA0:
$ NETCU START/IP/UNNUMBERED SLIP-1 192.168.95.12 'TT'
$ IF ($STATUS .NE. 1) THEN GOTO EXIT
$ NETCU ADD ROUTE 192.168.95.124 SLIP-1
$ NETCU ENABLE GATEWAY/ARP
$ EXIT:
$ LOGOUT
Once you set up the account and login file, the remote site simply dials up the OpenVMS system and logs in as the SLIP user to establish the connection. The login command file automatically configures the SLIP line.
Make sure to create a separate account and LOGIN.COM file for each remote SLIP site.
Outgoing Dialup SLIP Lines
To set up an outgoing dialup SLIP line:
1. Allocate the terminal device you wish to use. Enter: ALLOCATE terminal
2. Set the terminal characteristics (such as the baud rate) using SET TERMINAL commands.
3. Use SET HOST/DTE, KERMIT, or some other utility to dial the remote system and log in as the SLIP user.
4. If the remote end successfully starts the SLIP line, exit SET HOST/DTE or KERMIT.
5. Start the outgoing SLIP line. Enter:
$ NETCU START/IP SLIP-unit internet-address terminal
· SLIP-unit - is the controller number of the SLIP line you want to assign (this number is for identification only and must be unique). You can use an asterisk (*) as a wildcard value, which assigns the lowest unused line ID to the SLIP interface (starting with SLIP-0), and also defines the TCPWARE_LINE (global) symbol to be that interface. (See the START/IP command in the NETCU Command Reference, Chapter 2, NETCU Commands.)
· internet-address - is the internet address of the local host for the SLIP network.
· terminal - is the terminal device name.
You can also add any of the NETCU START/IP qualifiers supported for SLIP lines on the NETCU START/IP line.
The following is a sample outgoing SLIP line startup command:
NETCU START/IP SLIP-0 192.168.95.6 TXA7
6. Deallocate the terminal device. Enter: DEALLOCATE terminal
The SLIP line is now ready to use.
Disconnecting SLIP Lines
To disconnect a SLIP line, enter:
|
Note: TCPWare automatically removes the SLIP line from the network configuration if you configure the terminal device as a modem line with hang-up enabled, and you lose the phone line for any reason.
|
Full XON/XOFF Flow Control
The /FLAGS=FLOWCONTROL qualifier with the START/IP command configures the OpenVMS terminal device for full XON/XOFF control (READSYNC, HOSTSYNC, and TTSYNC). This means that you can use high speed modems that support compression and reliable data transfer modes. In addition, when OpenVMS terminal devices use full flow control, they do not need to use the alternate type-ahead buffer.
When you use /FLAGS=FLOWCONTROL qualifier with the START/IP command, TCPware configures the SLIP line to run a modified SLIP protocol. The modified SLIP protocol maps the characters shown below. Note that all numeric values are in octal.
|
Character name... |
Has ASCII value... |
With mapped character sequence... |
|
|
SLIP End of packet |
300 |
333 |
334 |
|
SLIP Escape |
333 |
333 |
335 |
|
XON |
021 |
333 |
336 |
|
XON + 200 |
221 |
333 |
337 |
|
XOFF |
023 |
333 |
340 |
|
XOFF + 200 |
223 |
333 |
341 |
RFC 1055, A Nonstandard for Transmission of IP Datagrams over Serial Lines: SLIP, defines the SLIP End-of-Packet and Escape characters, but does not define the XON/XOFF character mapping. TCPware uses this character mapping only when you specify /FLAGS=FLOWCONTROL.
|
Note: Only use /FLAGS=FLOWCONTROL when the other end of the SLIP line connects to a system running TCPware, and if you configure it to use this option.
|
Qualifiers with SLIP Lines
The START/IP command supports a number of other qualifiers that you can use with SLIP lines. For details, see Chapter 2 in the NETCU Command Reference.
Compressed SLIP
Use compressed SLIP (CSLIP) to compress the TCP/IP headers only (and not the data) over the SLIP line.
You can set CSLIP options in NETCU for the serial line to either compress all TCP/IP headers or to compress them if it receives a compressed header from the peer. Use the /FLAGS qualifier for the START/IP command, as follows:
|
This Command... |
Specifies that the serial line should compress... |
|
/FLAGS=COMPRESSED |
all TCP/IP headers. |
|
/FLAGS=AUTOENABLE |
TCP/IP headers only if the peer sends compressed TCP/IP headers. |
Troubleshooting SLIP
Access error messages help by entering HELP TCPWARE MESSAGES [identifier].
Also keep the following in mind:
· If you are not running TCPware on both ends of the SLIP connection, avoid using XON/XOFF flow control with SLIP. If you have a modem that uses XON/XOFF, disable that mechanism.
· If SLIP performance is poor, check that you configured the terminal to use the alternate type-ahead buffer (using SET TERMINAL /ALTYPEAHD /PERMANENT), and that you adjusted the SYSGEN TTY_ALTYPAHD parameter.