8. X.25 Interface
Introduction
This chapter describes the rules for adding information to the X25.CONF file so that you can build the X.25 mapping database. Review this entire chapter before attempting to do so. Examples of X25.CONF files and X25 module characteristics are included. The chapter is divided into the following sections:
• X.25 support
• System parameters
• Addresses
• Mapping database
• Sample X25.CONF files
• Sample X.25 module characteristics
• Troubleshooting
Support
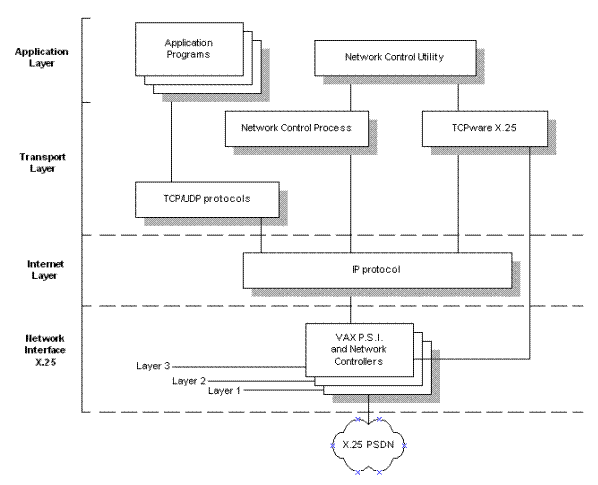
TCPware X.25 interface support conforms to RFC 1356. You can send IP datagrams as data packets over an X.25 network. In this way you can send and receive error free and reliable communications worldwide. Figure 8-1 shows the interaction between TCPware and the X.25 protocols.
System Parameters
You must install VAX P.S.I. version 4.3 or later on the system to provide IP-over-X.25 support. HP now distributes another VAX P.S.I. (v5.0) with the DECnet-VAX Extensions. The DECnet-VAX Extensions are for VMS version 5.4 and later.
You may need to change parameters for X.25 support using the following Network Control Utility (NETCU) commands:
|
|
Command |
Description |
|
1 |
START/IP/MTU |
For X.25 devices, set the maximum transmission unit (MTU) to 1500 bytes. However, if the system communicates with older versions of IP-over-X.25 (RFC 877), set the MTU to 576 bytes. Set the MTU to more than 1500 only by prearrangement with the other sites. |
|
2 |
START/TCP /NOKEEPALIVE |
Process Software recommends you set the /NOKEEPALIVE qualifier with the START/TCP command if anyone in your organization is on a tariff network. To disable KEEPALIVE, edit the TCPWARE:ROUTING.COM file and add: START/TCP /MSS=16384 /MWS=24576 /NOKEEPALIVE |
|
3 |
SET TCPRTOMIN |
Set the minimum TCP transmission time (TCPRTOMIN) to 2000 milliseconds for X.25 devices. |
|
4 |
Set the maximum TCP transmission time (TCPRTOMAX) to 15000 milliseconds for X.25 devices. |
Changes to network parameters made by these NETCU commands are active until TCPware shuts down. Update the ROUTING.COM file with these commands to make them permanent.
See the NETCU Command Reference, Chapter 2, NETCU Commands.
DTE or X.25 Addresses
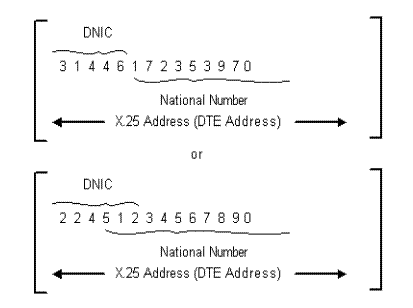
Each local and remote host in an X.25 network has a unique DTE address that the network uses to route calls. This address is similar to a telephone number; for example, 31446172353970. The address is usually 14 digits long and referred to here as an X.25 address.
The first four digits, the Data Network Identification Code (DNIC), identify the country and the network within the country. The following example shows the DNIC in bold:
31446172353970
Vendors that supply the X.25 network service within the country, assign the remaining digits (frequently referred to as the National Address). The National Address usually consists of 10 digits, but can be more or less. The maximum number of digits allowed in an X.25 address is 15. Occasionally you can add an optional subaddress (usually two digits) to the end of the national number.
Table 8-1 shows how one vendor assigns the national address based on geographic area codes. Other vendors use other schemes to assign the national address for a DTE.
|
|
National Address |
|
|
|
|
Country geographic code |
Local geographic code |
Specific DTE address |
|
3144 |
617 |
235 |
3970 |
|
3144 |
603 |
952 |
3698 |
Also, each host in IP-over-X.25 networking has an IP address; for example, 192.168.95.68.
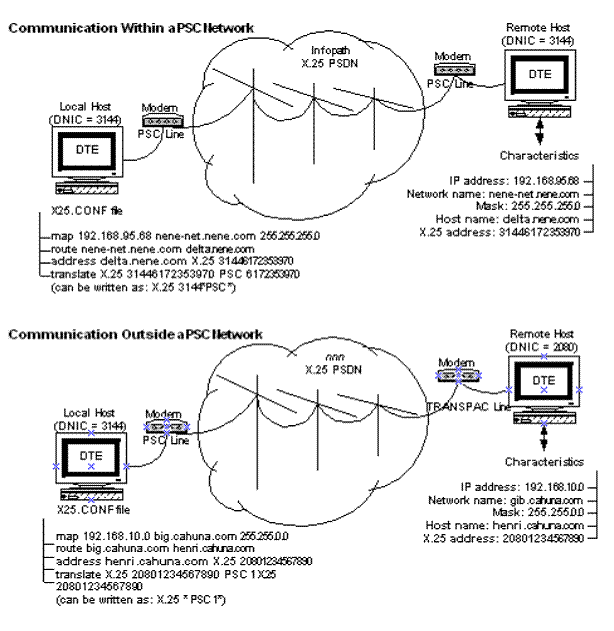
Figure 8-2 shows two sample X.25 addresses. The vendor in the second example uses the last digit of the DNIC as part of the national number.
You must use both the X.25 address and IP addresses of the remote host when you create entries in the X25.CONF file. The X25.CONF file always resides on the local host.
Mapping Database
Subscribers using X.25 network service must maintain a database table that maps the Internet and X.25 addresses of remote hosts. The system manager builds or changes this table by entering commands in the X25.CONF file.
The contents of the X25.CONF file provide the necessary information for a local host (Data Terminal Equipment [DTE]) to communicate with a remote DTE over an X.25 network.
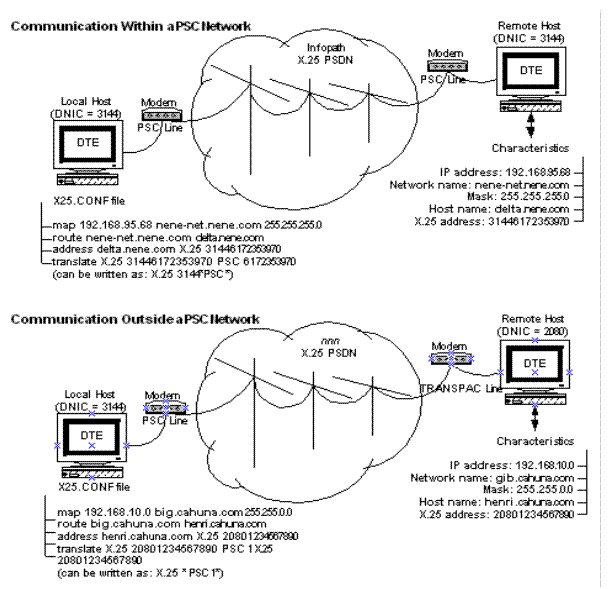
Table 8-2 lists the commands you use to build the mapping database in the X25.CONF file. Figure 8-3 shows the relationship of the command entries to the remote DTE.
Figure 8-3 Mapping to a Remote DTE (Host)

Before You Begin
Before you add mapping information to the X25.CONF file:
1 Make sure you are connected to X.25 through the Direct Access Facility (DAF).
2 Obtain from the remote network managers:
• Name and IP address of the remote hosts
• Network name of the remote hosts
• X.25 address for the remote hosts (a call number and Data Network Identification Code [DNIC])e host(s)
3 Obtain from your local carrier:
• Name of the local carrier entered during configuration of HP's VAX P.S.I. software; for example, PS or TRANSPAC
• Number sequence (escape codes) the local carriers uses to translate the X.25 address to the digits that go over the local carrier network
See also Appendix B, Data Network Identification Codes.
Database
Commands to Build the X.25 Mapping Database on the previous page describes the function of all the X.25 mapping database commands. To build the X.25 mapping database in the X25.CONF file, do the following:
1 Create the SYS$SPECIFIC:[TCPWARE]X25.CONF file:
a Add all map entries associated with the first remote host. Use the syntax:
map IP addressnetwork-name[mask IP-mask]
b Add all route entries associated with the first remote host. Use the syntax:
route network-namehost-name
c Add all address entries associated with the first remote host. Use the syntax:
address host-name {X.25 | ISDN} address
d Enter the translate entry associated with the first carrier. Use the syntax:
translate {X.25 | ISDN} patternPSI-network-namepattern
2 Repeat step 1 for each additional carrier connected to the local host.
3 Save the X25.CONF file and exit the editor.
Tips
The following subsections step you through building a sample mapping database in the X25.CONF file. Example 8-1 shows the full X25.CONF file.
Tips for building your mapping database in the X25.CONF file include:
• Enter a full set of mapping commands (as listed in Commands to Build the X.25 Mapping Database for each remote host you want to communicate with over the X.25 network; for example, map, route, address, and translate.
• Each mapping command you enter in the X25.CONF file has the explicit syntax described in the following subsections.
• The X25.CONF file resides on the local host.
• Translate entries contain information about the local carrier network; all other entries contain information about the remote host.
• You can have multiple map, route, address, and translate entries. The order that you enter these commands in the file does not matter.
Example 8-1 shows the X25.CONF file built using the examples shown in the next subsections. PS is the local carrier. In this example, the local host can communicate with the remote hosts eta.bedrock.com, delta.bedrock.com, and henri.napole.com.
map 192.168.95.1 eta.nene.com
map 192.168.95.68 nene-net.nene.com 255.255.255.0
map 192.168.10.0 big.cahuna.com 255.255.0.0
route nene-net.nene.com delta.nene.com
route big.chauna.com henri.cahuna.com
address eta.nene.com X.25 31446172353980
address delta.nene.com X.25 31446172353970
address henri.cahuha.com X.25 20801234567890
translate X.25 3144* PS *
translate X.25 * PS 1*
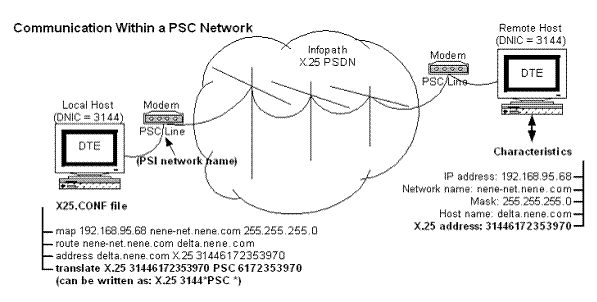
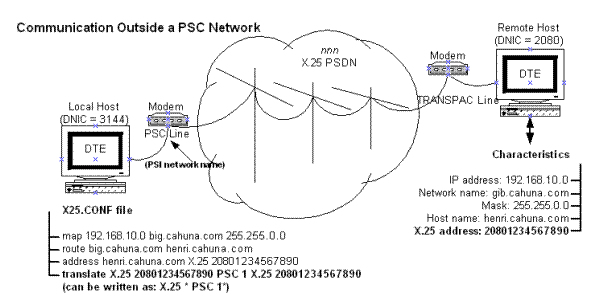
Map Entries
The map entry maps the IP address of the remote host to the network name on which the remote host resides.
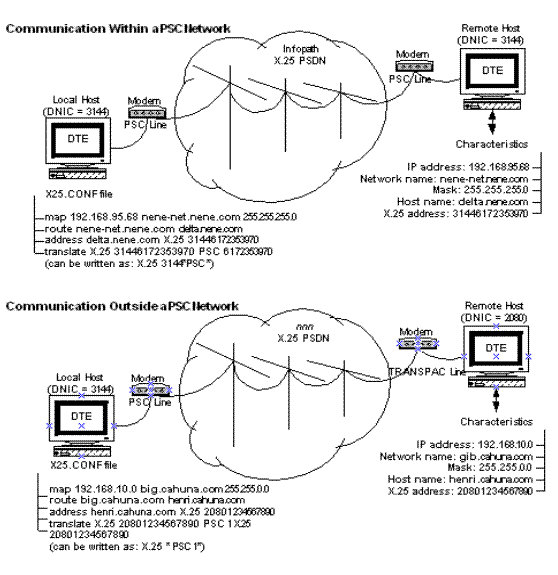
Create map entries for the remote hosts in the X25.CONF file as shown in Example 8-2. See also the map and related entries highlighted in Figure 8-4.
If you map to the whole network, include the IP mask.
map IP-addressnetwork-name[mask IP-mask]
For example:
map 192.168.95.68 nene-net.nene.com mask 255.255.255.0
or
map 192.168.10.0 big.cahuna.com mask 255.255.0.0
As shown in Example 8-3, you do not need to enter a network mask if you add a map entry for a single system.
map IP-addresshost-name
For example:
map 192.168.95.1 eta.nene.com
Route Entries
The route entry maps the network name of the remote network to the name of the remote host.
Create route entries for the remote hosts in the X25.CONF file as shown in Example 8-4. See also the route and related entries highlighted in Figure 8-5.
route network-namehost-name
For example:
route nene-net.nene.com delta.nene.com
or
route big.cahuna.com
henri.cahuna.com
You do not need to include route information if the host routes to itself. For example, no route information need accompany the entry
map 192.168.95.1
eta.nene.com
shown in Example 8-4.
Address Entries
The address entry maps the name of the remote host to the X25 address for the remote host.
Create address entries for the remote hosts in the X25.CONF file as show in Example 8-5. See also address and related entries shown in Figure 8-6.
Note that the address is the X.25 address. It includes the DNIC and the national address. You can also specify optional X.25 standard facilities as shown in Example 8-5.
address host-name {ISDN | X.25} address FACILITY <hex-string>]
[WINDOW number]
[PACKET number]
[REVERSE]
[INCOMING]
For example:
address delta.nene.com X.25 31446172353970
or
address eta.nene.com X.25 31446172353980 (not shown in Building an X25.CONF File: Address)
or
address henri.cahuna.com
X.25 20801234567890
In this example, the hex string is local facilities added to the call, including the PSDN-specific number if needed. Use the options shown in the example for facilities such as packet size, window, or reverse charging.
Note! The INCOMING option means that you should only use the address to recognize incoming calls and never to make outgoing calls.
See Appendix B, Data Network Identification Codes, for a listing of DNICs and related information. Contact your local carrier for information if your long distance carrier is not listed, or the necessary information is not included in the table.
Translate Entries
The translate entry maps the X25 address of the remote host to the digits used in the local carrier network. There are two types of translate entries that you may need to include in theX25.CONF file:
• Entries for communication within the local carrier network
• Entries for communication going outside the local carrier network
Each carrier has its own set of rules governing the translation of X.25 and ISDN addresses to the digits that actually go over the carrier network. See Appendix B, Data Network Identification Codes, or contact your local carrier for this information.
Within a Carrier Network
Create the translate entries for communication within the carrier network as shown in Example 8-6. See also the translate and related entries shown in Figure 8-7.
translate {X.25 | ISDN} pattern PSI-network-namepattern
where the first pattern is the X.25 address (DTE address) and second pattern is the number string required by the local carrier network.
For example:
translate X.25 3144* PS * (see Note 1)
or
translate X.25 2080* TRANSPAC * (see Note 1)
or
translate X.25 2145*
IBERPAC 5* (see Note 2)
Note 1: For any X.25 communication going from the local host: If the DNIC portion of the destination X.25 address matches the DNIC of the local carrier (3114 or 2080), then remove all the DNIC digits and keep all the digits represented by the asterisk (*). Send this string over the local carrier network.
Note 2: For any X.25 communication going from the local host: If the DNIC portion of the destination X.25 address matches the DNIC of the local carrier, then remove the first three DNIC digits (in this case 214) and keep the last DNIC digit (in this case 5) and all the digits represented by the asterisk (*). Send this string over the local carrier network.
See Appendix B, Data Network Identification Codes,for details. Contact your local carrier if the necessary pattern information is missing.
Outside a Carrier Network
Create the translate entries for communication outside the carrier network as shown in Example 8-7. See also the translate and related entries shown in Figure 8-8.
In this example, you must specify the full X.25 address prefixed by "1" to communicate with a remote host located in a different carrier network.
translate {X.25 | ISDN} patternPSI-network-namepattern
where the first pattern is the X.25 address and second pattern is the number string required by the local carrier network.
For example:
translate X.25 * PS 1*
For any X.25 communication going from the local host: If the DNIC portion of the destination X.25 address does not match any of the other translate entries, then add a 1 in front of all the digits represented by the *. Send this string over the local carrier network.
See also Appendix B, Data Network Identification Codes, for details. Contact your local carrier if the necessary pattern information is missing.
Sample X25.CONF Files
The following examples show the X25.CONF file for three host systems, Condor, Eagle, and Hawk. Condor and Hawk subscribe to the carrier network DCS in Belgium. Eagle subscribes to carrier network DATANET in the Netherlands. Table 8-4 shows the characteristics for each host.
|
Characteristics... |
For Condor... |
For Eagle... |
For Hawk... |
|
IP address |
192.168.1.9 |
192.168.1.7 |
192.168.3.1 |
|
Network name |
calif.ert.com |
aviary.environ.com |
sierra.green.com |
|
Mask |
255.255.255.0 |
255.255.0.0 |
none |
|
Host name |
condor.ert.com |
eagle.environ.com |
hawk.green.com |
|
X25 address |
2062555121 |
2041345678 |
2062765443 |
|
Carrier network |
DCS |
DATANET |
DCS |
The carrier network DCS has a DNIC of 2062. The translate entry for this DNIC is:
translate X.25 2062* DCS 2*
(remove 206 from the string but
retain 2 for communication within the DCS network)
translate X.25 * DCS 0* (add 0 to the string for communication outside the network)
The carrier network DATANET has a DNIC of 2041. The translate entry for this DNIC is:
translate X.25 2041* DCS 1*
(remove 204 from the string but
retain 1 for communication within the DCS network)
translate X.25 * DCS 0* (add 0 to the string for communication outside the network)
On Condor
In Example 8-8, the local host Condor can communicate with the remote hosts eagle.environ.com and hawk.green.com.
Because hawk.green.com subscribes to the DCS carrier network, Condor uses the first translate entry to establish communication with Hawk.
Because eagle.environ.com does not subscribe to the DCS carrier network, Condor uses the second translate entry to establish communication with Eagle.
map 192.168.1.7 aviary.environ.com 255.255.0.0
route aviary.environ.com eagle.environ.com
address eagle.environ.com X.25 2041345678
map 192.168.3.1 sierra.green.com
route sierra.green.com hawk.green.com
address hawk.green.com X.25 2062765443
translate X.25 2062* DCS 2*
translate X.25 * DCS 0*
On Hawk
In Example 8-9 the local host Hawk can communicate with the remote hosts eagle.environ.com and condor.ert.com.
Because condor.ert.com subscribes to the DCS carrier network, Hawk uses the first translate entry to establish communication with Condor.
Because eagle.environ.com does not subscribe to the DCS carrier network, Hawk uses the second translate entry to establish communication with Eagle.
map 192.168.1.7 aviary.environ.com 255.255.0.0
route aviary.environ.com eagle.environ.com
address eagle.environ.com X.25 2041345678
map 192.168.3.1 calif.ert.com
route calif.ert.com condor.ert.com
address condor.ert.com X.25 2062555121
translate X.25 2062* DCS 2*
translate X.25 * DCS 0*
On Eagle
In Example 8-10 the local host Eagle can communicate with the remote hosts condor.ert.com and hawk.green.com.
Because neither condor.ert.com nor hawk.green.com subscribe to the DATANET carrier network, Eagle uses the second translate entry to establish communication with Condor and Hawk.
map 192.168.3.1 calif.ert.com
route calif.ert.com condor.ert.com
address condor.ert.com X.25 2062555121
map 192.168.3.1 sierra.green.com
route sierra.green.com hawk.green.com
address hawk.green.com X.25 2062765443
translate X.25 2041* DATANET 1*
translate X.25 * DATANET 0*
Sample Module Characteristics
Example 8-11 shows the NCP command and output to demonstrate the X.25 module characteristics on the specified DTE. If you use X.25 access, use the NCP command that starts with SHOW MODULE X25 ACCESS ... to display the network characteristics.
NCP>show module x25-p known dtes
Module X25-Protocol Volatile Summary as of 1-Jun-2014 13:03:49
|
DTE |
Network |
State |
Active Channels |
Active Switched |
|
990002 |
DIRECT |
on - unsynchronized |
0 |
0 |
|
6172353970 |
PS |
on - running |
2 |
2 |
NCP>show module X25-p dte 990002 characteristics
Module X25-Protocol Volatile Characteristics as of 1-Jun-2014 13:-04:25
NCP Command shows the NCP command and output to demonstrate the X.25 module characteristics on the specified DTE.
NCP>show module X25-p dte 6172353970 characteristics
Module X25-Protocol Volatile Characteristics as of 1-Jun-2014 13:-04:52
DTE = 6172353970
Network = PS
Line = DSV-0-0
Channels = 4-1
Maximum channels = 4
Maximum circuits = 512
Default data = 128
Default window = 2
Maximum data = 128
Maximum window = 2
Maximum clears = 2
Maximum resets = 2
Call timer = 200
Clear timer = 180
Reset timer = 180
Restart timer = 180
Interrupt timer = 180
Interface mode = DTE
Troubleshooting
If you have problems running X.25, do the following:
• Enter the TRACE * command as the first line in the X25.CONF file on the OpenVMS system.
This causes an analysis of what occurred on the network to be written to the X25.LOG file. You do not have to restart TCPware after you edit the X25.CONF file. Note that each new X.25 connection reads this file.
• If you have VAX P.S.I. with X.29, enter the SET HOST/X29 command to try to connect to your destination.
This command uses DECnet and VAX P.S.I. to connect rather than TCPware. If this fails, there is a problem with your P.S.I. configuration and TCPware will not work until the problem is corrected.
• Enter NCP, then enter the following command:
NCP>SHOW MODULE X25-ACCESS KNOWN NETWORKS
This NCP command shows the names of X.25 networks as they are configured in VAX P.S.I. This command is useful when there is a possibility that the X25.CONF file might be specifying a national X.25 network incorrectly.
TCPware and VAX P.S.I. need to be configured to use the same network name. Sometimes VAX P.S.I. might be configured with nicknames for the national networks. Later you might get a different name for the network from your carrier and enter that in the X25.CONF file. In this case you need to change the X25.CONF file or reconfigure VAX P.S.I.