12. Managing NFS Client
Introduction
This chapter describes how to manage the NFS-OpenVMS Client. Topics include client management concepts and how to mount remote file systems. The information applies to both NFSv2 and NFSv3 clients unless otherwise specified.
Client Concepts
The management concepts discussed in this chapter include:
• The NFS client-server concept
• User and file protection
• Filename and file version mapping
Client-Server
The Client provides access to NFS-served file systems while resolving differences in user space and file access between the two systems. Consider the scenario in Figure 13-1 where separate clients use a single NFS server.
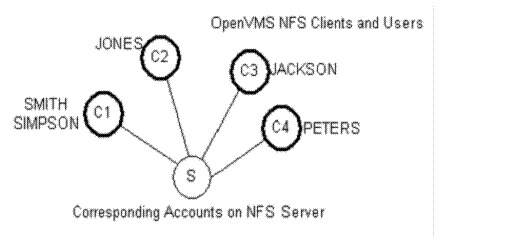
The indicated users for OpenVMS clients C1, C2, C3 and C4 need access to corresponding accounts on server S. If client users want group privileges to server files, the client system manager must create a group identity for the client users that maps to a group identity on S.
For example, SMITH and SIMPSON on C1 must have access to the smith and simpson accounts on S. If they also want group access to files on S, the client system manager must give them group identity (say, ACCOUNTING) on C1, even though they may not be part of the same user group on C1.
User and File Protection
User and file protection are different in NFS and OpenVMS. Because of this, TCPware has to map user and file protection between the systems.
In order for the client to perform a server operation, two things apply:
1 The server must authorize the operation based on what its account can do following NFS/UNIX rules.
2 The client does its own user and file protection checking following OpenVMS rules.
The server has ultimate authority as to whether it should let the client perform the operation and may deny access based on NFS rules. Figure 13-2 shows this.
So that your client users can have access to server files:
1 Make sure the server system manager has the name of your client host in its export database. On many UNIX systems, this database is in the /etc/exports file; on hosts running TCPware Server, it is the EXPORT database.
2 Register each of your local users as having individual access to the appropriate server accounts. Do this by maintaining the PROXY database.
3 Register each of your local users as having the same group access to files as user groups on the server. Do this by maintaining the GROUP database.
The Client protects files and checks file access on the server using the following criteria:
• User and group identification of whoever requests access to a file
• Owner of the file
• Type of file access the user can have
• Special user privileges
The following sections cover these criteria more fully.
User and Group Identification
One way to protect a file is to check the identity of the user requesting access. If the server identifies that the user has access to the file, the server grants access to it.
NFS User Identification.NFS uses UNIX semantics. These consist of a User ID (UID), Group ID (GID), and GID list. A user has a unique UID, belongs to a primary group, and can be a member of a limited number of other groups.
All NFS hosts must share the same user space so that a user has the same identity on all systems. Because an account with a single UID on the server can belong to many groups (can have multiple GIDs), you must associate a list of groups with that account.
Most UNIX servers have /etc/passwd and /etc/group files that maintain UID, GID, and group list information. The /etc/passwd file includes the account's login name, password, UID, and GID. The /etc/group file includes group names and their associated GID numbers and list of users. Each user can have a group list of up to 16 GIDs.
Parts of sample /etc/passwd and /etc/group files appear in Example 13-1 and Example 13-2 respectively.
Example 13-1 Sample /etc/passwd File
nobody:Nologin:-2:-2:anonymous NFS user:/:/bin/date
ris:Nologin:11:11:Remote Installation Services
Account:/usr/adm/ris:/bin/sh
daemon:*:1:1:Mr Background:/:
sys:PASSWORD HERE:2:3:Mr Kernel:/usr/sys:
bin:PASSWORD HERE:3:4:Mr Binary:/bin:
root:PASSWORD HERE:0:1:supervisor:/
edwards:PASSWORD HERE:100:/usr/users/edwards
Example 13-2 Sample /etc/group File
login:*:15:joe2
other:*:20:
accounting:*:10:edwards,root
testing:*:11:edwards,root
OpenVMS User Identification. In OpenVMS, a user has a unique user ID code (UIC) in the format [group,member], where group and member are alphanumeric, or in the format USERNAME, which is the member part of the UIC. For example, a UIC can be [306,210], [GROUP1,JONES], or just JONES.
You can also identify groups of OpenVMS users through general or system-defined rights identifiers. An example is the ACCOUNTING identifier that gives all users in the accounting department the same access rights to files. The OpenVMS system manager defines the general identifiers in the system rights database using the AUTHORIZE utility.
Table 13-1 reviews the differences between NFS and OpenVMS system user identification.
User Identification Mapping. User identification mapping between client and server is straightforward. Because an NFS account has the same UID across multiple groups, the Client maps UIDs directly to OpenVMS UICs. If the Client finds an appropriate mapping entry in the PROXY database, the local user has access to the server account.
|
NFS user identification... |
Compared to OpenVMS user identification... |
|
User ID (UID), Group ID (GID): identified as: uid gid |
User Identification Code (UIC): identified as: [group,member] |
|
GID List: |
Rights Identifier: |
Group Identification Mapping. Group identification mapping occurs through a special GROUP database because of the difference between the NFS and OpenVMS group concept. This database ensures that the group privileges in OpenVMS more accurately reflect the file group privileges on the server side.
Although OpenVMS users may be in the same OpenVMS group, they must take into account that their corresponding NFS server accounts may be in different groups. NFS accounts in the same group should allow group access to their corresponding users in OpenVMS, even though the latter may not belong to the same UIC-based group.
You must populate the GROUP database, as well as the rights identifiers list in OpenVMS. Entries in the GROUP database map NFS group numbers to assigned OpenVMS groups. The mappings are either to wildcarded OpenVMS group entries, such as [1000,*] (which means "group 1000, any member"), or to rights identifiers, such as ACCOUNTING.
Table 13-2 reviews how the Client handles user identification mapping.
|
Table 13-2 User Identification Mapping from Client to Server |
||
|
OpenVMS user identification... |
Maps using... |
For NFS authorization... |
|
UIC |
PROXY database |
UID, GID |
|
UIC, Rights Database |
GROUP database |
GID List |
File Ownership and Protection
NFSFile Ownership and Protection. Each NFS file has an owner and access restrictions (file protection) for various classes of users. File ownership and protection are file attributes.
Each NFS file has a UID and GID. When you create a new file, the NFS system:
• Sets the file's owner UID to the effective UID of the creating process.
• Bases the file's owner GID on the set-gid bit in the file's parent directory:
|
If on |
the owner GID becomes that of the parent directory. |
|
If off |
the owner GID becomes the effective GID of the creating process. |
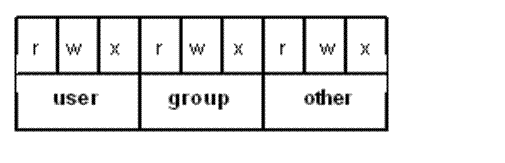
NFS systems use a protection mask scheme for file protection. The NFS file protection categories are part of the file's mode attribute and are user, group, and other, each having read (r), write (w) or execute (x) access. NFS systems arrange the protection masks as in Figure 13-3.

You can see the protection mask when you issue an ls -l command on the UNIX system server, as in the following example:
>ls -l
total 13949
-rwxr-x--x 1 smith 13330Jan 15 17:31 book
-rwxr-x--- 1 smith 44 Jan 15 17:31 games.com
drwxr-x--- 2 smith 512 Jan 15 17:38 Work
drwxr-x--- 1 smith 63 Jan 15 17:31 MARKET.rpts
In the example, the book file grants read (r), write (w), and execute (x) access to the file's user; r and x access to the group; and x access to the other category of users.
The lines beginning with d indicate directories. None of the files other than book provide access for the other user category, nor do any of the directories.
OpenVMS File Ownership and Protection. You own a file in OpenVMS if your UIC and the file's owner UIC are the same. When you create a new file, its owner is:
• The owner of the previous version of the file if you have rights to that owner
• The parent directory's owner if you have rights to that owner
• Your UIC
Each OpenVMS file has a protection mask that defines:
• The categories assigned to the file
• The types of access granted to each category
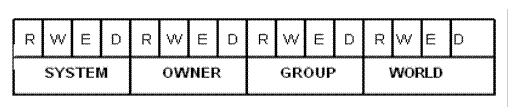
The four categories of OpenVMS file access are SYSTEM, OWNER, GROUP, and WORLD. Each category can have up to four types of access: read (R), write (W), execute (E), and delete (D).
OpenVMS arranges the protection masks as in Figure 13-4.
In the following example, the SYSTEM and OWNER categories both have read (R), write (W), execute (E), and delete (D) access to the file. However, the GROUP category only has R and E access, and the WORLD category has no access at all:
SYSTEM=RWED, OWNER=RWED, GROUP=RE, WORLD=<NO ACCESS>
File Ownership Mapping. Table 13-3 shows how the Client maps file ownership between server and client.
|
NFS file attribute... |
Maps using... |
For OpenVMS file attribute... |
|
UID, GID |
PROXY database |
Owner UIC |
|
GID List |
GROUP database |
(special group handling) |
File Protection Mapping. File protection mapping from server to client is slightly different than mapping from client back to server. Both map the access privileges for non-group file access categories to the corresponding privileges on the other system. However, you must establish group access through the GROUP database. The Client handles file protection mapping from server to client as in Table 13-4.
Note! The Client honors the file protection scheme in the special, invisible ACL it creates for the file, and not in any other regular ACL.
|
NFS category... |
In OpenVMS is... |
With NFS type... |
In OpenVMS is... |
|
user |
OWNER/SYSTEM |
r |
R |
|
|
|
w |
W |
|
|
|
x |
E |
|
|
|
|
D (unless ADF denies) 1 |
|
group |
GROUP |
r |
R (if GROUP database allows) 2 |
|
|
|
w |
W (if GROUP database allows) 2 |
|
|
|
x |
E (if GROUP database allows) 2 |
|
|
|
|
D (unless ADF denies) 1 |
|
other |
WORLD |
r |
R |
|
|
|
w |
W |
|
|
|
x |
E |
|
|
|
|
D (unless ADF denies) 1 |
|
1The Client allows delete (D) access only if a special attributes data file (ADF) the Client may create (and associates with the file) does not explicitly deny file deletion. |
|||
|
2 If a GROUP entry that maps to a rights identifier (such as ACCOUNTING) exists, the Client ignores the group protection mapping as given and uses the protection scheme in the special Access Control List (ACL) it creates instead. If a GROUP entry that maps to other than a rights identifier (such as a wildcarded group reference like [1000,*]) exists, the Client honors the group protection mapping as given. |
|||
The Client also handles file protection mapping from client back to server (such as when you create a file or change its attributes in OpenVMS), as in Table 13-5.
|
OpenVMS category... |
In NFS is... |
With OpenVMS type... |
In NFS is... |
|
SYSTEM |
(not mapped) |
|
|
|
OWNER |
user |
R |
r |
|
|
|
W |
w |
|
|
|
E |
x |
|
|
|
D |
(not mapped) |
|
GROUP |
group |
R |
r |
|
|
|
W |
w |
|
|
|
E |
x |
|
|
|
D |
(not mapped) |
|
WORLD |
other |
R |
r |
|
|
|
W |
w |
|
|
|
E |
x |
|
|
|
D |
(not mapped) |
Special Users and Privileges
Systems have users (or privileges given to users) that OpenVMS treats specially when checking access.
OpenVMS provides SYSPRV privilege (which gives access to the SYSTEM category), BYPASS privilege (which bypasses all checking, giving all access), and READALL privilege (which provides a user at least READ and CONTROL access).
So that the NFS server can grant these privileges, the user must have superuser access on the server. The superuser usually acquires UID=0.
The Client places undefined users by default in the nobody category, which provides a set of minimum access privileges. UID=-2 becomes user nobody and GID=-2 becomes group nobody.
Filename Mapping
For specific rules for mapping filenames between client and server, see Appendix A, NFS-to-OpenVMS Filename Mapping.
File Version Mapping
File version mapping can get rather complex due to the difference in behavior between OpenVMS and NFS systems. The general rule is that OpenVMS supports file versions; many NFS systems do not, and simply overwrite files on upgrading them. However, the TCPware Client does preserve file versions on the server (unless you use the NFSMOUNT /NOVERSION qualifier to limit file versions to one).
The Client still preserves an unversioned file on the server, which it hard-links to the highest (not necessarily most recent) version of the file every time it is upgraded.
In OpenVMS you could find the following DIRECTORY output:
Directory NFS4:[000000]
FILE-A.TXT;2 FILE-A.TXT;1 FILE-B.TXT;3 FILE-C.TXT;1
Total of 4 files.
The corresponding ls output on a UNIX NFS server would have the same files as follows:
total 6
174771-rwxr-x---2 root5 Jun2 11:36file-a.txt
174768-rwxr-x---1 root2 Jun2 11:35file-a.txt;1
174771-rwxr-x---2 root5 Jun2 11:36file-a.txt;2
174769-rwxr-x---2 root2 Jun2 11:36file-b.txt
174769-rwxr-x---2 root2 Jun2 11:36file-b.txt;3
174770-rwxr-x---1 root2 Jun2 11:36file-c.txt
Table 13-6 shows the file version rules when translating files from OpenVMS to NFS. Table 13-7 shows the file version rules when translating files from NFS to OpenVMS.
|
Rule |
What Happens to Filenames from OpenVMS to NFS... |
|
1 |
An initial version of a file gets no version number: FOOBAR.TXT;1becomes foobar.txt EXCEPTION: A file explicitly created as version 1 when a higher version already exists, which creates an explicit foobar.txt;1. |
|
2 |
An upgraded file is linked with the unversioned file, and if the previous version was unversioned, it gets a version number: FOOBAR.TXT;2becomes foobar.txt (with a hard link to foobar.txt;2) FOOBAR.TXT;1becomesfoobar.txt;1 This rule also applies if using NFSMOUNT /NOVERSION and upgrading a file that already has a version in NFS, or creating one with an explicit version. |
|
3 |
If using NFSMOUNT /NOVERSION and upgrading a file that shows only as unversioned in NFS, the file is overwritten and remains unversioned: FOOBAR.TXT;1becomes foobar.txt (with foobar.txt;1 purged) EXCEPTION: An attributes data file (ADF) specifies a version limit other than one, or an explicit version upgrade is specified. |
|
Rule |
What Happens to Filenames from OpenVMS to NFS... |
|
1 |
An unversioned file gets a version number preceded by a semicolon: foobar.txt becomes FOOBAR.TXT;1 |
|
2 |
If a filename does not include a file extension dot (.), it acquires one before the version number semicolon: foobar becomes FOOBAR.;1 |
|
3 |
After being translated, the file will not show up in the OpenVMS listing if its version number is greater than 32767. |
Filesystem Mounting
The Client links authorized (exportable) remote NFS filesystems to your OpenVMS system by mountingthem (making them available) on a file structure you specify.
OpenVMS arranges file storage the user can access in directory trees. OpenVMS roots each tree (at the top) at an NFS device (such as NFS1:). The format of an NFS device is the following, where n is a number from 1 to 9999, is NFSn:.
If you specify NFS0:, the Client uses the template device and increments the n number by one for each new mount on the client host. For example, if someone mounts a filesystem on your host's NFS5: device and you specify a mount on NFS0:, the next mount is on NFS1: (or the next available device). The Client uses the template device only when you specify NFS0: or omit the mount point specification entirely.
The mount point is both the point on the remote directory tree to be mounted and the point on the local directory tree where the Client "attaches" the remote filesystem. A mount point can be at any level. OpenVMS's Record Management Services (RMS) lets you specify eight directory levels in addition to the master file directory (MFD or [000000]).
The most common Client mount point is the MFD of the NFS device (NFSn:[000000]). Lower level mounts create virtual directories. For example, if you specify a mount point NFS1:[A.B], the Client creates virtual directories A and B on NFS1. These directories disappear once you dismount the filesystem.
NFS mounts are node-specific and not cluster-wide. Other nodes in the cluster cannot access these files. This has implications for printing files and running batch jobs and programs in a cluster. (See the next section.)
When a mount is initiated it is first tried as NFS v3 and if that fails as NFS v2. This can be overridden with the /NFS={2|3} qualifier which will cause it to only try the specified NFS version. With NFSv3 the device will be mounted as an OpenVMS ODS-5 device on systems that support it if the NFSv3 server recognizes differences in case in file names. When the device is mounted as an ODS-5 device the filename mapping detailed in Appendix A is NOT used.
Cluster Environments
NFS is not VMS clustering. VMSclusters use RMS file locking that is more tightly coupled than the NFS advisory file level locking mechanism. In NFS, cluster-wide programs that store or exchange file IDs are unlikely to function properly. The NFS device is not available cluster-wide and the same filesystem mounted on different nodes has different file IDs.
The best NFS strategy is to allow only one NFS client system to write to the server files. If you need multiple clients to write to the same file, use the Network Lock Manager (NLM) by specifying NFSMOUNT /LOCK. Also ensure that all systems (client and server) use the NLM to coordinate file access of the participating systems. NLM provides advisory locking, not mandatory locking as with VMSclusters.
The fact that the Client mounts filesystems only on the local OpenVMS cluster node has implications for printing files and running batch jobs and programs in a cluster environment. In printing a file, make sure that you set up the printer on the node on which you mount the NFS filesystem. Also make sure that no one remounted the NFS filesystem during the print operation. Otherwise the print operation fails because the Client changes the file ID with each mount (the printing system keeps track of jobs using file IDs). The same applies to batch jobs involving NFS files.
To print files in or submit batch jobs for mounted NFS filesystems across the cluster, first copy the files to a "standard" non-NFS disk which you can access cluster-wide.
For details on network file locking and its implications for both client and server users, see Chapter 14, NFS-OpenVMS Server Management, Network File Locking. Also see Network File Locking in this chapter.
Mount Example
Figure 13-5 shows an example of an exported UNIX filesystem mounted in OpenVMS.
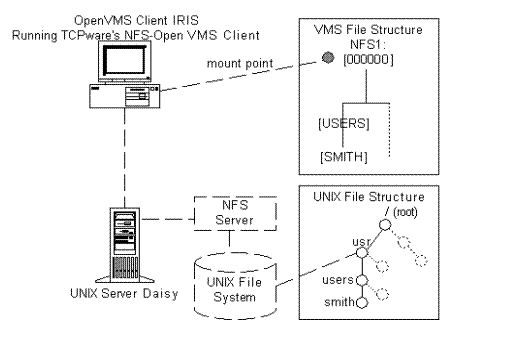
In the figure, an OpenVMS user on host IRIS needs access to the /usr/users/smith subdirectory on UNIX system server Daisy. Other IRIS users may need access to subdirectories below /usr.
Using the NFSMOUNT command at the DCL prompt, IRIS's system manager mounts /usr on IRIS's NFS1: device, where the files are now "attached" to NFS1:[000000]. The Client creates two virtual directory levels ([USERS.SMITH]) below NFS1:[000000]. If the user wants access to files in /usr/users/smith, the way to access them is through NFS1:[USERS.SMITH].
Had the system manager mounted /usr/users/smith instead of just /usr on the same mount point, /usr/users/smith would be equivalent to NFS1:[000000]. However, the user would then be excluded from any directory level above /smith (/usr and /users).
Mount Flexibility
The flexibility of the Client's mount capabilities appears in Figure 13-6. The NFS filesystem is on the left and the corresponding OpenVMS filesystem is on the right. Each row is a directory level. The solid line pointing from /usr to [000000] indicates the mount scenario indicated in Mounting a UNIX Filesystem on the OpenVMS Client , where the user mounted the /usr filesystem on NFS1:[000000].
The dotted lines indicate that you can essentially bend the arrow anywhere around the central pivot point so that you can mount any server filesystem level on any client filesystem level. You can mount a low server directory on a high client mount point, a high directory on a low mount point, a low directory on a low mount point, and so on.
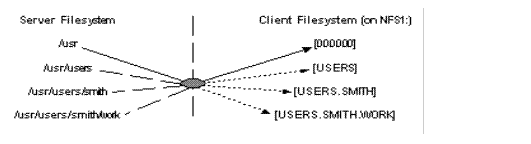
You can even mount a file on a file, such as /usr/users/smith/junk.txt on NFS1:[USERS.SMITH]JUNK.TXT. However, mounting a file limits the user to accessing that file only. This makes new file creation impossible since the Client cannot "go up" the directory tree to get the necessary attributes to create a new file.
You can only access server resources from the mount point on down. For example, if you use the following NFSMOUNT command, you can access all available resources in Daisy's /usr/user/smith directory mounted locally as NFS1:[USERS.SMITH], but you cannot back up to NFS1:[USERS] and expect to access resources in Daisy's /usr directory that are not in the /users subdirectory:
$ NFSMOUNT DAISY "/usr/users/smith" NFS1:[USERS.SMITH]
You can use NFSMOUNT command options for certain mount strategies for your specific implementation, such as automounting and background mounting.
For details, see Mount Strategies .
Mount Commands
The Client commands related to file mounting appear in Table 13-8.
|
Table 13-8 Client Mount Commands |
|
|
Command |
Description |
|
$ NFSMOUNT |
Mounts a remote NFS directory on a local mount point; similar to UNIX systems' /etc/mount file |
|
$ NFSDISMOUNT |
Dismounts a remote NFS directory from a local mount point; similar to UNIX systems' /etc/unmount file |
|
$ NFSMOUNT /CONFIG |
Mounts a remote NFS directory on a local mount point based on information in a configuration file |
|
$ NFSMOUNT /SHOW |
Shows the mount information for the local mount point |
Perform mount commands at the DCL level. The NFS mount command format is:
NFSMOUNT server "pathname"[mountpoint [logical]]
|
server |
is the name of the remote NFS server. |
|
"pathname" |
is the server's exported pathname (enclosed in quotation marks). |
|
mountpoint |
is the optional NFS device (and directory path, if necessary) where the mount occurs on the OpenVMS host. If you do not specify the mount point, the default is NFS0:[000000], the MFD mount on the template device, as discussed earlier. |
|
logical |
is the optional logical name associated with the mountpoint. |
The following command mounts Daisy's /usr/users filesystem on the NFS1:[000000] mount point:
$ NFSMOUNT DAISY "/USR/USERS" NFS0: DAISY$USR_USERS
The Client immediately creates the NFS1: mount point based on the NFS0: template specification. The mount point also gets the (optional) logical name DAISY$USR_USERS.
The NFS dismount command format is:
$ NFSDISMOUNT mountpoint
mountpoint is the mount point or logical name, as defined above.
Mount Strategies discusses the various mount and dismount options. For details on the mount and dismount commands, see Client Commands.
Symbolic Links
The Client supports symbolically linked (known as "soft-linked") files on UNIX servers. This support preserves existing symbolic links when you back up your client filesystems and restore them on these servers.
The Client does not "chase" symbolic links. If you open a soft-linked file in OpenVMS, it displays the pathname of the linked file, unlike UNIX systems that display the actual content of the linked file.
Client Auditing
The Client supports OpenVMS security auditing that keeps track of security events users can cause and issues security alarms for these events.
See HP's Guide to VMS System Security for details.
Mount Strategies
The Client offers several ways to mount a filesystem:
• Regular mount
• Shared mount
• Automount
• Background mount
• Overmount
• Occluded mount
• Mount using network file locking
Regular
The following shows a sample confirmation message given when mounting SIGMA's /usr directory on an NFS0: template device:
$ NFSMOUNT SIGMA "/usr" NFS0:
%NFSMOUNT-S-MOUNTED, /usr mounted on NFS101:[000000]
If you use the same command again, the Client creates a new mount point (such as _NFS102:[000000]).
There are other options you can set using command qualifiers during a regular mount, such as setting SYSGEN parameters and cache timeout.
These options appear in Other Mount Options. For the mount qualifiers, see the NFSMOUNT command in Client Commands.
Shared
The Client supports shared mounting through the use of the /SHARE qualifier to the NFSMOUNT command. The format of a shared mount request is as follows:
$ NFSMOUNT BART "/ENG" NFS1: BARTMOUNT
$ NFSMOUNT/SHARE BART "/ENG" NFS1:
The first mount request creates the NFS1: device, and puts the BARTMOUNT logical in the system logical name table. The mount count is set to one. The second (shared) mount request, which includes the same mount information, increments the mount count by one. Unless you specify the /SHARE qualifier and the same hostname, path, and device/mount point for the second mount request as for the first, the second mount request is considered a new mount request and not a shared mount request.
Logical names go into the SYSTEM logical name table by default. A /SHARE mount, however, puts the logical name in the JOB logical name table. In this way the logical name is only available to processes of the job mounting the device.
The mount count increments and decrements under the following circumstances, instead of being automatically set to zero:
• With an initial SYSTEM or GROUP mount
• With a DCL MOUNT /SHARE or TCPware NFSMOUNT /SHARE command that completes without an error (the exception being an overmount, where the previous mount point is dismounted, in which case it may even be decremented if the previous mount point was shared)
In this way, if the main process of the job logs out, the job mount is deallocated, and the volume mount count decrements by one (and if zero, dismounts the device). OpenVMS handles dismounting differently based on whether you use TCPware's NFSDISMOUNT or the DCL DISMOUNT command:
|
If using... |
Then... |
|
TCPware's NFSDISMOUNT |
The NFS Ancillary Control Process (NFSACP) dismounts one or more (in the case when using the /ALL qualifier) mount points. If the mount point being dismounted is the only or last one for the device, the device is dismounted for all users who mounted it and the mount count is decremented to zero. If more than one mount point exists, the mount point is dismounted along with any specifically shared mounts. |
|
DCL DISMOUNT |
OpenVMS checks for JOB mounts first. If a JOB mount for the specified device exists, the JOB mount is dismounted, the associated logical (if any) is deallocated, and the mount count is decremented by one. If no JOB mount exists, OpenVMS checks for SYSTEM and GROUP mounts. If one of these exists and the user has the required privilege (SYSNAM or GRPNAM), the SYSTEM or GROUP mount is dismounted, any associated logical name is deallocated, and the mount count is decremented by one. No mount points are dismounted until the mount point hits zero. If the user does not have the required SYSNAM privilege, the error message SYSTEM-F-NO-SYSNAM, operation requires SYSNAM privilege is returned, with a similar message for the GRPNAM privilege. |
Consider the mount counts in the mount/dismount sequence shown in Table 13-9.
|
|
Command... |
Creates mount count... |
|
1 |
NFSMOUNT BART "/ENG" NFS1:[A] |
1 (system: increment) |
|
2 |
NFSMOUNT/SHARE BART "/ENG" NFS1:[A] |
2 (shared: increment) |
|
3 |
MOUNT/SHARE NFS1: |
3 (shared: increment) |
|
4 |
NFSMOUNT MARGE "/TEST" NFS1:[B] |
3 (system again: do not increment) |
|
5 |
NFSDISMOUNT NFS1:[A] |
2 (remove #1: do not decrement, and remove #2: decrement) |
|
6 |
DISMOUNT NFS1: |
1 (remove #3: decrement) |
|
7 |
DISMOUNT NFS1: |
0 (remove #4: decrement) |
Note! That the mount count in #5 is not decremented because the first NFSMOUNT is a system mount. The original mount for BART "/ENG" on NFS1:[A], along with its shared mount, is dismounted. #6 and #7 further decrement the mount count to zero.
Automounting
Use the /AUTOMOUNT qualifier to automount a filesystem, which automatically and transparently mounts a remote server path as soon as the Client obtains the pathname. You can specify an inactivity period (the default is five minutes, seconds being rounded to the nearest minute), after which the Client automatically dismounts the path.
In this example, the Client mounts SIGMA's /usr filesystem when it references the pathname, keeping the path mounted until an inactive period of 10 minutes, after which time it unmounts the filesystem (subsequent references causing the Client to remount it):
$ NFSMOUNT SIGMA "/usr" NFS0: /AUTOMOUNT=(INACTIVITY=00:10:00)
Background
Use the /BACKGROUND qualifier to mount a filesystem in background mode, where the Client tries to mount a filesystem at least once. If the first try fails, the Client informs you of the failure and tries again every 30 seconds (by default). Unless you set it otherwise, the Client stops retrying after 10 attempts.
In this example, the Client tries to mount the /usr filesystem; if it cannot, it waits one minute and retries the connection up to 20 times:
$ NFSMOUNT SIGMA "/usr" NFS0: /BACKGROUND=(DELAY=00:01:00,RETRY=20)
Overmounting
Use the /FORCE qualifier to overmount a filesystem, where you mount another path on an already existing mount point. The Client dismounts the original filesystem and replaces it with the new one. (If you omit /FORCE, the message overmounting requires the use of /FORCE appears.) Mounting a higher or lower directory level in a previously used path also causes an overmount, as in the following example:
$ NFSMOUNT SIGMA "/usr" NFS1:[USERS.MNT]
%NFSMOUNT-S-MOUNTED, /usr mounted on _NFS1:[USERS.MNT]
$ NFSMOUNT SIGMA "/usr/users" NFS1:[USERS.MNT] /FORCE
%NFSMOUNT-S-REMOUNTED, _NFS1:[USERS.MNT] remounted as /usr/users on SIGMA
Occluded
Use the /FORCE qualifier for an occluded mount, where you mount a filesystem onto a client mount point that is higher or lower in the directory structure than an existing, active mount. (If you omit /FORCE, the message occlusion requires the use of /FORCE appears.) No dismounting occurs and both mounts are visible. However, the Client occludes (hides from view) the subdirectory (or subdirectories) added to or dropped from the original mount specification when you perform a directory listing.
In the following example, the mount point specification moves up one subdirectory. If you enter the NFSMOUNT /SHOW command, both mounts are visible. However, if you do a directory listing on NFS2:[USERS.SMITH], the [MNT] directory is no longer visible. To make the directory visible again, dismount NFS2:[USERS.SMITH].
$ NFSMOUNT SIGMA "/usr"
NFS2:[USERS.SMITH.MNT]
%NFSMOUNT-S-MOUNTED, /usr mounted on _NFS2:[USERS.SMITH.MNT]
$ NFSMOUNT SIGMA "/usr" NFS2:[USERS.SMITH]
/FORCE
%NFSMOUNT-S-MOUNTED, /usr mounted on _NFS2:[USERS.SMITH]
-TCPWARE-I-OCCLUDED, previous contents of _NFS2:[USERS.SMITH] occluded
Network File Locking
Use the NFSMOUNT /LOCK command to enable network file locking during an NFS mount. The NLM applies the lock to any file you create or to which you request exclusive access in the specified filesystem. The locks are on entire files only and not on file regions or byte ranges. Here is a typical example:
$ NFSMOUNT SIGMA "/usr" NFS0: /LOCK
Other Mount Options
This section identifies other mount options you can set.
Auto-converting Text Files
By default, the Client automatically converts newly created text files of variable-length, implied carriage return control (VAR-CR) format to STREAM-LF format. This is appropriate for UNIX system servers, where the files show up as stream_lf. For a PC system server, however, use the NFSMOUNT /CONVERT=STREAM_CRLF option to do a carriage-return-line-feed conversion for the mount point. Converted files will show up on the server as stream files, as do files that do not have attributes data files (ADFs) associated with them (see the next section).
Some OpenVMS applications require that certain files remain in VAR-CR format on the client (such as with TCPware's NFS-OpenVMS Server). You can retain the VAR-CR format by specifying the /NOCONVERT qualifier during a mount. For example:
$ NFSMOUNT SIGMA "/usr" NFS0: /NOCONVERT
Attributes Data Files
Attributes data files (ADFs) are special companion files the Client maintains on a non-VMS server to preserve attribute information the server would not normally recognize.
The Client maintains regular and default ADFs for files such that:
1 If a regular ADF exists, the Client uses the attributes from that file.
2 If a default ADF exists, the Client uses the attributes from that file.
3 If no ADF exists, the file must be STREAM-LF.
The Client may create a regular ADF for a file in response to a write attributes operation that sets an OpenVMS attribute that NFS cannot normally maintain. For example, a SET FILE /NOBACKUP command would cause the Client to create an ADF, since NFS has no concept of this OpenVMS attribute.
Default ADFs minimize the number of regular ADFs, since one default ADF can serve all files of a particular type. The Client provides default ADFs for files with .EXE, .HLB, .MLB, .OBJ, .OLB, .STB, and .TLB extensions. The Client does not provide ADFs for files with the .TXT and .C extensions, since most of these are STREAM-LF.
For example, TCPWARE:EXE.ADF is the default ADF for all .EXE type files. When you create .EXE files (or if they exist on the server), the record attributes from the single default ADF are probably enough to define each file. Each file does not need its own regular ADF.
Note! The Client uses only certain record attributes and file characteristics in default ADFs. It uses the 32-byte ATR$C_RECATTR attributes other than the FAT$L_HIBLK, FAT$L_EFBLK, FAT$W_FFBYTE, and FAT$W_VERSION fields, and uses four-byte ATR$C_UCHAR attributes other than the FCH$M_DIRECTORY and FCH$M_CONFIG bits. All other information stored in an ADF is ignored for default ADFs. For additional details on these file attributes, see HP’s OpenVMS I/O User's Reference Manual, the ACP-QIO Interface chapter.
When a user creates a file on the client, the Client only creates a "regular" ADF for it if the default ADF attributes or default attributes do not match.
You can create customized ADFs for special applications. To do so:
1 On the client, create a special application file that creates an ADF on the server.
2 Suppose that application file is TEST.GAF. On the server, check the listing for the data file, along with its ADF (.$ADF$test.gaf;1):
>ls -a
.
..
.$ADF$test.gaf;1
test.gaf
3 On the server, copy the ADF file to a newly created default ADF file on the client:
>cp .\$ADF\$test.gaf\;1 gaf.adf
Note the backslashes (\) required to recognize the UNIX system special $ symbol and the ; symbol required to specify a version number.
4 On the client, copy the new default ADF file to the TCPWARE_COMMON:[TCPWARE] directory:
$ COPY GAF.ADF TCPWARE_COMMON:[TCPWARE]
5 Dismount all the NFS volumes and remount them again. This starts another NFS ancillary control process (ACP) so that the newly copied default ADF file can take effect.
You can also specify how you want ADFs used. The Client offers three options with the /ADF qualifier of the NFSMOUNT command:
|
CREATE |
If ADFs exist on the server, the Client uses them, updates them, and creates them for new files. This setting is the default and recommended setting. |
|
UPDATE |
If ADFs exist on the server, the Client uses them and updates them, but does not create them for new files. |
|
USE |
If ADFs exist on the server, the Client uses them, but does not update them, nor does it create them for new files. |
Note! Avoid using UPDATE and USE. The Client may still create ADFs in certain cases, such as when renaming files. Also, changing OpenVMS attributes for a hard-linked file can result in inconsistent OpenVMS attributes between the linked files.
You can also specify /NOADF. In this case, the Client treats all files as STREAM-LF unless a default ADF matches and it can use it. Note that this mode of operation is only appropriate for read-only filesystems, since the Client cannot adequately handle application-created files when /NOADF is in effect.
Cache Timeout
Use the /CACHE_TIMEOUT qualifier to set the caching timeout period for the mount point. For example:
$ NFSMOUNT
/CACHE_TIMEOUT=(DIRECTORY=::15,ATTRIBUTE=::10)
The DIRECTORY timer specifies the time (in delta time) the Client waits
between rereading a directory's status or contents. The default is ::30 (30
seconds). The ATTRIBUTE timer specifies the time the Client waits between
rereading a file's attributes from the server. The default is ::15 (15
seconds).
Read/Write Transfer Size
Use the /DATA qualifier to specify the largest amount of NFS data you want to read (receive) or write (transmit) in a single network operation. For example:
$ NFSMOUNT /DATA=(1024,1024)
The first value is the read value and the second is the write value. Most servers let you read or write 8192 bytes (the maximum and default setting). However, some may require less. The minimum you can specify is 512 bytes.
If you eliminate the parentheses and specify only one value, this serves for both the read and write value. However, if the NFS server requests a smaller transfer size than the one you set, the server's requested value will override yours.
Default User
Use the /USER qualifier to specify the default user to which you want to map unknown UIDs. For example:
$ NFSMOUNT /USER=SMITH
The Client tries to use the USER account. If not found, the DECNET account becomes the default. If the DECNET account is not found, the [200,200] account becomes the default.
Default UIDs and GIDs
Use the /UID and /GID qualifiers to specify the default UID and GID. The Client uses the default UID and GID if there is no mapping for the requesting user in the PROXY database. Usually the default UID is -2 and default GID is -2. For example:
$ NFSMOUNT /UID=100/GID=15
Limiting File Versions
Use the /NOVERSION qualifier to enforce a limit of one version on a non-TCPware server file. This is a way of imposing an NFS file versioning scheme on OpenVMS files. (/VERSION, allowing multiple versions, is the default).
With /NOVERSION, unversioned files stay unversioned, and new files are unversioned along with any subsequent upgrades (which is consistent with most NFS servers). When higher versions already exist, the number of versions cannot grow beyond the current number, so that the lowest version is purged on each upgrade.
For example, with /NOVERSION in effect, if you start with FILE.TXT;1 (which shows up as file.txt on the server) and you edit FILE.TXT, you have an overwritten FILE.TXT;1 on the client, and file.txt on the server. If you already have FILE.TXT;1 and FILE.TXT;2 and you edit FILE.TXT, you end up with FILE.TXT;3 and FILE.TXT;2 on the client, with version 1 purged. The server shows file.txt, file.txt;2, and file.txt;3 (hard-linked to file.txt).
To prepare a directory for use with /NOVERSION, it may be best to purge and rename its files, as follows, being aware that purged files are lost forever and to back up your files whenever possible:
$ PURGE *.* ; deletes old versions
$ RENAME *.*;* *.*;1 ; forces server to rename files to
unversioned
$ SET FILE /VERSION=1 *.* ; overrides existing ADFs
Superusers
Use the /SUPERUSER qualifier if you want to allow access to the superuser account UID on the server. For example:
$ NFSMOUNT /SUPERUSER=200
To enable superuser privilege, the server must allow access to the superuser and the OpenVMS user must have SYSPRV, BYPASS, or READALL privileges. Normally, the superuser UID is 0. The default is /NOSUPERUSER.
Mount Type
If you specify a logical name for the mount point, the Client creates a system logical name by default. This is equivalent to using the /SYSTEM qualifier of the NFSMOUNT command. If you specify the /GROUP qualifier, the Client considers the mount a group mount and places the logical name (if specified) in the group table. Both mounts are subject to a privilege check.
Server Type
Use the /SERVER_TYPE qualifier to set the server type to UNIX, TCPware, or IBM_VM. By default, the server type is UNIX or TCPware, depending on the server. For example:
$ NFSMOUNT /SERVER_TYPE=IBM_VM
The server types displayed in Table 13-10 are available with the Client.
|
Option |
Description |
|
IBM_VM |
IBM Virtual Machine (VM) machines |
|
TCPWARE |
OpenVMS systems running NFS-OpenVMS Server |
|
UNIX |
All UNIX system machines |
TCPWARE Server Type
When mounting a filesystem served by TCPware's NFS-OpenVMS Server (Version 4.0 and later), either omit /SERVER_TYPE or specify /SERVER_TYPE=TCPWARE. If omitted, the Client determines the TCPWARE server type automatically. Note the following:
• The Client and Server map UICs to UIDs and GIDs. As long as system managers on each system maintain the PROXY databases properly, this saves having to maintain the same set of UICs on the client and server systems.
• The Client and Server use ACLs as is. This means that identifiers on the client and server systems must be the same to produce the desired results.
IBM_VM Server Type
IBM's VM NFS server partially supports requests to change file size. This means that:
• OpenVMS Files-11 ODS-2 is a block-oriented filesystem. Applications (and RMS) can only read and write 512-byte blocks. The Client uses ODS-2 file attributes to maintain information about the true last data byte of a file.
To accommodate the IBM VM NFS server's inability to truncate a file to its real size (the Client normally truncates the file based on the end-of-file information), the Client stores the size information in the ADF for the file.
• With any access to the file from a non-TCPware NFS client or an application on the server, you may see garbage beyond the true end of the data. (This garbage data exists because of the block nature of ODS-2 and the server's inability to truncate the file to its real size.)
• With a file stored on the IBM VM NFS server by a non-TCPware client or an application on the server itself, the ADF does not reflect any changes to the file. This can cause problems if a client later opens the file, expecting changes.
When mounting a filesystem on an IBM VM minidisk, you must specify certain IBM VM NFS server specific parameters in the pathname parameter of the mount command. For example, a mount to an IBM VM minidisk might be:
$ NFSMOUNT IBMVM "test2.191,rw,user=simpson,pass=bart,record=nl"
You may need to specify one or both of the following parameters:
record={binary | nl | text}
|
binary (default) |
The IBM VM NFS server does not convert data to EBCDIC. This mode is most useful when storing data to which you do not have access from applications on the IBM system, or when transferring binary data. |
|
nl |
The IBM VM NFS server translates EBCDIC to ASCII (and vice versa). This mode is most useful when storing text files to which you have access from applications on the IBM system. Do not use it when you have access to or store binary data files. |
|
text |
The file conforms to the IBM VM CMS structure. Use of this parameter value is not generally recommended. |
name={trans | fold | mixed}
|
trans (default) |
Supports the widest range of filenames. The IBM VM NFS provides transparent mapping for filenames that contain invalid characters or are longer than CMS allows. However, the Client does not use this mapping if the filename (ignoring case) is valid on the CMS filesystem. Therefore, for short filenames, the mapping may not be transparent. |
|
fold |
Only supports filenames valid to the CMS filesystem and ignores case. |
|
mixed |
Like name=fold except that it preserves case. |
For complete details on these server types, see the IBM TCP/IP for VM: User's Guide.
Retry Times
Use the /RETRIES qualifier to specify the maximum number of times the Client retransmits a Remote Procedure Call (RPC) request. For example:
$ NFSMOUNT /RETRIES=10
There is no maximum value you can specify. The default is zero (0) retries, where the Client retries the requests indefinitely.
Timeout Times
Use the /TIMEOUT qualifier to set the minimum timeout period (specified in OpenVMS delta time – see Delta Time Examples ) for initial RPC request retransmissions.
The timeout period value should reflect the estimated typical
round trip time for RPC requests. For slower speed links (such as over SLIP or
WAN lines), use a larger value than the default of one second. For example, for
a maximum read/write size of 8192 bytes (see the /DATA qualifier) over a
19,200-baud SLIP line, the absolute minimum timeout value is:
The 10240 bytes are 8192 plus RPC overhead. Since 4.27 seconds is the absolute minimum, a more realistic value for this link is in the range of 15 to 30 seconds to allow for other traffic.
Volume Labels
Use the /LABEL qualifier to specify the volume label to use for the remote pathname during a mount. If you omit /LABEL, the Client uses a default label consisting of the first 12 characters of the combined server:mountpoint parameter. The Client applies the /LABEL qualifier on the first mount of an NFS device only and ignores it with subsequent mounts on that device. If you perform a SHOW DEVICE NFSn: DCL command, you see only the first 12 characters of the volume label specified.
Cache Space
One of the options during a mount is the /PROCESSOR=UNIQUE qualifier setting. As a general rule, the larger the remote filesystem, the more likely you are to use this option.
With /PROCESS=UNIQUE, a new NFSACP process is created for each mount. This creates multiple address space, in which case the collective ACPs can accommodate much more cached information. The size of the cached information depends mostly on the number of NFS files the client recognizes by obtaining a file handle and creating a mapping to a file ID. This happens with any file or directory access.
Each NFSACP process can support up to 250 mounted filesystems. If one process is handling all mounts, there is only one address space to cache the information. The size of this address space depends on a number of system parameters such as VIRTUALPAGECNT, and process parameters such as the working set limits and paging file limits.
Disk Quotas
You can display quota information for the current user's mount by using the NFSMOUNT /SHOW command with the /QUOTA qualifier. The output displays block usage, soft limit (quota), hard limit, and grace period. Using the additional /FULL qualifier displays four additional values that are relevant to UNIX servers: file usage, quota, limit, and grace period.
You can use the additional /USER qualifier to request quotas for other than the current user. However, the NFSMOUNT required the /SUPERVISOR qualifier and SYSTEM, BYPASS, and READALL privileges. (The DCL command SHOW QUOTA also works in this case.)
The following shows sample output:
$ NFSMOUNT /SHOW NFS2: /QUOTA /FULL
_NFS2:[000000] mounted
viola:/pctest
Disk Quotas for user [SMITH]: (inactive)
Blocks Quota Limit Grace Files Quota Limit Grace
117355 500000 600000 0 0 0
Transport UDP Writing Enabled
Read/write size 8192/8192 Write conversion Disabled
RPC timeout 0 00:00:01.00 ADF usage USE,UPDATE,CREATE
RPC retry limit 0 Fileids Unique, Nolookups
Attribute time 0 00:00:15.00 Server type TCPware
Directory time 0 00:00:30.00 Advisory Locking Disabled
Cache Validation MODIFY TIME Default user [USER]
Superuser No Default UID,GID 100,15
Implementation
There are only minor differences between the way the Client and Files-11 ODS-2 handle files. For example, the Client:
• Does not determine the physical placement of files on the disk.
• Does not support the INDEXF.SYS file, which means that you cannot perform operations such as ANALYZE/VERIFY and BACKUP/IMAGE in OpenVMS.
Note! The NFS-OpenVMS Client is not supported in the POSIX environment.
Client Commands
Table 13-11 shows the mount and dismount commands available at the DCL level in OpenVMS.
|
Table 13-11 Mount and Dismount Commands |
|
|
DCL command |
Description |
|
$ NFSMOUNT |
Mounts a remote NFS directory on a local mount point; similar to UNIX systems' /etc/mount file |
|
$ NFSDISMOUNT |
Dismounts a remote NFS directory from a local mount point; similar to UNIX systems' /etc/unmount file |
|
$ NFSMOUNT /CONFIG |
Mounts a remote NFS directory on a local mount point based on information in a configuration file |
|
$ NFSMOUNT /SHOW |
Shows the mount information for the local mount point |
The mount and dismount commands use OpenVMS delta time for all time-related values.
The delta time syntax is:
dddd hh:mm:ss.cc
|
|
Is the number of... |
|
dddd |
days (0-9999); if less than one day, specify zero (0); follow with a blank space |
|
hh |
hours (0-23) |
|
mm |
minutes (0-59) preceded by a colon (:) |
|
ss |
seconds (0-59) preceded by a colon (:) |
|
cc |
hundredths of a second (0-99) preceded by a period (.) |
You can truncate a delta time on the right. You can omit fields in the time format as long as you include the punctuation that separates the fields. You must specify the days field even if you omit all time fields. Table 13-12 shows some examples of delta time.
|
Table 13-12 Delta Time Examples |
||
|
Delta time... |
Can be truncated... |
And means... |
|
3 |
3 |
3 days from now |
|
3 03:00:00 |
3 3 |
3 days and 3 hours from now |
|
0 00:03:00 |
0 :3 |
3 minutes from now |
|
0 00:00:03 |
0 ::3 |
3 seconds from now |
|
0 00:00:00.03 |
0 ::.3 |
3 hundredths of a second from now |
Troubleshooting
NFS-OpenVMS Client can produce messages for the NFSMOUNT and NFSDISMOUNT commands, and in OPCOM.
Access error messages help by entering HELP TCPWARE MESSAGES [identifier], or connect to web site http://www.process.com (select Customer Support followed by the Error Messages button).
NFSMOUNT
Mounts a remote NFS directory to a local mount point. The command is similar to the UNIX system /etc/mount command.
DCL Format
NFSMOUNT server "nfs-path" [mountpoint [logical]]
Parameters
server
Name of the remote server, in domain name or IP address format.
"nfs-path"
Pathname (enclosed in quotation marks) on the remote server. The pathname must match an exported directory, subdirectory, or file of an exported filesystem on the server. (You can use the SHOW EXPORT command in the TCPware Network Control Utility (NETCU) to obtain a list of the exported directories.)
mountpoint
NFS device (and, optionally, directory tree) specification for the local mount point. If specified, this parameter must be in the format:
NFSn:[[dir.dir....]][filename]
The value n can range from 1 to 9999, and dir is a directory level (up to eight in addition to the [000000] directory). If you omit the mountpoint specification or specify NFS0:, the Client creates an NFSn:[000000] mount point, and increases n by one for each subsequent mount.
logical
Optional logical name associated with the volume. The Client defines the logical as follows:
• If you mount NFSn:[000000] NFSn:
• If you mount NFSn:[dir.dir] NFSn:[dir.dir.]
The extra dot after the last dir in the second definition allows for relative directory specifications. If you perform the following function:
SET DEFAULT logical:[subdir]
the full default definition becomes:
NFSn:[dir.dir.subdir]
The Client places the logical name in the SYSTEM logical name table unless you specify the /GROUP or /SHARE qualifier. The Client deletes the logical name from the SYSTEM table when you dismount the volume. The process must have SYSNAM privilege to mount a system mount point. Without SYSNAM or GRPNAM privilege, the user must specify /SHARE for a JOB mount.
Qualifiers
/ACP_PARAMS=([BUFFER_LIMIT=limit-value]
[,DUMP]
[,IO_DIRECT=value]
[,IO_BUFFERED=value]
[,MAX_WORKSET=pages]
[,PAGE_FILE=filespec]
[,PRIORITY=base-priority]
[,WORKSET=pages])
Includes SYSGEN ACP and detached process parameters the system manager can set or modify. The SYSGEN parameters that affect ACPs are dynamic. The Client applies the ACP parameters only at the initial start of an ACP and ignores them in subsequent mount requests when the Client uses the same ACP.
/ADF=option
/NOADF
Controls whether you want to use attributes data files (ADFs). These files appear on a non-VMS server as .$ADF$filename files and the server uses them to store OpenVMS file attributes. You cannot directly view these files on the client system. The possible ADF option values are:
|
CREATE (the default and forced if /SERVER_TYPE=TCPWARE) |
If ADFs exist on the server, the Client will use, update, and create them for new files. |
|
UPDATE |
If ADFs exist on the server, the Client will use and update them, but not create them for new files. |
|
USE |
If ADFs exist on the server, the Client will use them, but not update them nor create them for new files. |
Avoid using UPDATE and USE. The Client may create ADFs anyway in certain cases, such as when renaming files. Also, changing VMS attributes for a hard-linked file may result in inconsistent VMS attributes between the linked files.
/AUTOMOUNT[=(INACTIVITY=inactive-time)]
Mounts a server filesystem automatically and transparently when you obtain the pathname. INACTIVITY specifies a maximum inactive period for the mount attempt. When the Client reaches this period, it unmounts the pathname. Specify the time in delta (see Delta Time Examples ). The default is five minutes (:5). Seconds are rounded to the nearest minute.
/BACKGROUND[=(DELAY=delay-time,RETRY=retries)]
Attempts to mount the filesystem at least once in background mode. If the first mount attempt fails, it informs you and keeps retrying after an optionally specified time delay and number of retries. If omitted, the DELAY defaults to 30 seconds (::30 in delta time). The maximum delay period you can specify is approximately 49 days. The default RETRY times value is 10. If you specify RETRY=0, the Client uses 1 instead.
/CACHE_TIMEOUT[=([DIRECTORY=t][,ATTRIBUTE=t][,READ_DIRECTORY])]
Caching timeout information for the mount point. The following keywords apply:
|
The DIRECTORY timer |
Specifies the amount of time (t) the Client waits between rereading a directory's status or contents. Specify the time in delta format (see Delta Time Examples ). The default is 30 seconds (::30 in delta time). |
|
The ATTRIBUTE timer |
Specifies the amount of delta time (t) the Client waits between rereading a file's attributes from the server. The default is 15 seconds (::15 in delta time) |
|
The READ_DIRECTORY keyword |
Forces the Client to read the contents of the directory requested when the cache timeout occurs, rather than relying on the directory's modified time. By reading the directory contents, the client can be aware of any changes to the number of files within the directory even if the directory's modify time was not updated. |
/CONVERT={ STREAM_LF
(default) | STREAM_CRLF }
/NOCONVERT (forced for TCPware's NFS Server)
Controls whether the Client should convert sequential, variable-length, carriage return carriage control (VAR-CR) files to STREAM-LF files for UNIX system servers or STREAM_CRLF for PC system servers. Some OpenVMS applications require that certain files remain VAR-CR. The default is /CONVERT=STREAM_LF unless you use /SERVER_TYPE=TCPWARE, in which case TCPware forces a /NOCONVERT.
You can only convert files opened using RMS sequential access to STREAM-LF or STREAM_CRLF format when written by the client.
The NFS Client does not perform conversions when “block mode transfers” are performed. COPY and EDT use block mode transfers when copying or creating files. Instead of COPY, use the CONVERT command. Instead of EDT, use the TPU command. Most applications do RMS sequential access when they create files on the export and these will be converted.
/DATA=[(]read-bytes[,write-bytes][)]
Largest amount of NFS data received (read-bytes) or transmitted (write-bytes) in a single network operation. The default for both is 8192 bytes, the maximum allowable value appropriate for most servers. The minimum is 512. If you specify only one value, that value applies to both read and write. However, you can use different values for each.
You do not normally need to use the /DATA qualifier unless a remote server imposes a restriction on data size. Also, if the NFS server requests a smaller transfer size than the one set with this qualifier, the server's requested value will override the one set by /DATA.
/FILEIDS={UNIQUE (default) | NONUNIQUE}
With UNIQUE (the default), the client uses filenames and 32-bit NFS file IDs when processing the directory information returned by the server, to determine whether cached information is valid.
With NONUNIQUE, the client uses file handles instead of file IDs in retrieving directory information. This can refresh directory entries in the client's cache more quickly, resulting in fewer "no such file" errors. However, this can degrade performance since the Client must issue additional RPC requests. /FILEIDS=NONUNIQUE automatically implies a /LOOKUPS, so do not use it together with an explicit /NOLOOKUPS.
/FORCE
/NOFORCE (default)
Controls whether or not to force an overmount or a mount that can cause filesystem occlusion. This qualifier requires OPER privilege. Overmounting a /SYSTEM mount requires SYSNAM privilege. Overmounting a /GROUP mount requires GRPNAM privilege.
/GID=gid
Default GID if no GID mapping exists for file access. The default value is -2. Requires OPER privileges.
/GROUP
Places the logical name in the group logical name table. If the mount is the first group or system mount on the volume, /GROUP marks the volume as group-mounted and increments the mount count. Requires GRPNAM privilege. Do not use with /SYSTEM.
/LABEL=volume-label
ODS-2 volume label used for the remote pathname. You can use this qualifier to provide a unique volume label on a system where there is a conflict. The default is the first 12 characters of the combined server:mountpoint parameter. The Client accepts only the first 12 characters for all other entries. The Client applies the /LABEL qualifier on the first mount of an NFS device only and ignores it with subsequent mounts on that device.
/LOCK
/NOLOCK (default)
Specifies whether the Client should use advisory network file locking by way of the Network Lock Manager (NLM) to coordinate access to server files.
/NOLOOKUPS (default)
/LOOKUPS
With /NOLOOKUPS (the default), the Client does not look up file handles when building directory caches. However, when accessing an individual file, it does look up its file handle; and with a directory operation, it still looks up the handle for every file in the directory. Do not use an explicit /NOLOOKUPS together with /FILEIDS=NONUNIQUE.
/NFS={2|3}
Specifies that only a particular version of NFS be used when attempting to mount the unit. If this qualifier is not specified, then NFSv3 is attempted first and then NFSv2 if that fails. The NFSv3 ACP can only be used to service NFSv3 mount points and the NFSv2 ACP can only be used to service NFSv2 mount points, so caution is advised when using the /PROCESSOR qualifier. NFSv3 mount points will be presented as an ODS-5 disk for OpenVMS systems that recognize ODS-5 when the server maintains the case of filenames and maintains the number of hardlinks. When the device is presented as an ODS-5 device there is no mapping of filenames; case sensitivity and parsing rules are controlled by the VMS process parameters.
/NOREADDIRPLUS
For NFSv3 this disables the use of the READDIRPLUS command to read directory and file information. The client will fall back to using READDIR if it detects that the server does not support READDIRPLUS, so this is only necessary if there is a problem when using READDIRPLUS. Note that READDIRPLUS is generally more efficient than READDIR.
/OWNER_UIC=uic
Specifies the UIC assigned ownership of the volume while you mount it, thereby overriding the ownership recorded on the volume. The Client applies the /OWNER_UIC qualifier on the first mount of an NFS device only and ignores it with subsequent mounts on that device.
/PROCESSOR={UNIQUE | SAME:nfs-device | FILE:filespec}
Requests that NFSMOUNT associate an Ancillary Control Process (ACP) to process the volume, which overrides the default manner in which the Client associates ACPs with NFS devices. The qualifier requires OPER privilege. The possible keyword values are:
|
UNIQUE |
Creates a new ACP (additional address space) for the new NFS device. This is useful for mounting large remote filesystems so that you can accommodate more cached information. (See Cache Space .) |
|
SAME:nfs-device |
Uses the same ACP as the specified device. The nfs-device specified cannot be mounted as UNIQUE. Care should be taken when using this as NFSv2 and NFSv3 mount points can not share an ACP. |
|
FILE:filespec |
Creates a new ACP running the image specified by a particular file. You cannot use wildcards, node names, and directory names in the filespec. Requires CMKRNL or OPER privilege. |
/PROTECTION=protection-code
Protection code assigned the volume, following the standard syntax rules for specifying protection. If you omit a protection category, the Client denies that category of user access. The default is (S:RWED,O:RWED,G:RWED,W:RWED).
The Client applies the /PROTECTION qualifier on the first mount of an NFS device only and ignores it with subsequent mounts on that device. /PROTECTION requires OPER privilege.
/RETRIES=max-retries
Maximum number of times the Client retransmits an RPC request. The default is zero (0), where the Client retries the request indefinitely.
/SERVER_TYPE=server-type
Type of server from which the Client mounts data. The valid values for server-type are:
|
UNIX |
TCPWARE |
IBM_VM |
The default is either UNIX or TCPWARE (if the server runs TCPware's Server).
With /SERVER_TYPE=TCPWARE, TCPware forces /NOCONVERT and /ADF=CREATE regardless of their specified settings.
/SHARE
Places the logical name in the job logical name table and increments the volume mount count regardless of the number of job mounts. When the job logs out, all job mounts are dismounted, causing the volume mount count to be decremented. (See Shared.)
/SUPERUSER=uid
/NOSUPERUSER (default)
Controls whether the Client maps users with SYSPRV, BYPASS, or READALL privileges to the superuser UID. The server must allow superuser access. The normal superuser UID is 0.
/SYSTEM (default)
Places the logical name in the system logical name table (the default action). If the mount is the first group or system mount on the volume, this marks the volume as system mounted and increments the volume mount count. Requires SYSNAM privilege. Do no use with /GROUP.
/TIMEOUT=timeout-period
Minimum timeout period (in OpenVMS delta time) for initial RPC request retransmissions. The default is ::1 (one second).
The timeout-period value should reflect the estimated typical round trip time for RPC requests. For slower speed links (like NFS traffic over SLIP or WANs), a larger value than the default would be appropriate.
For example, for a maximum read/write size of 8192 (see the /DATA
qualifier) over a 19,200-baud SLIP line, the absolute minimum timeout value
should be:
The 10240 bytes are 8192 data bytes plus the worst case RPC overhead of 1048 bytes. Since 4.27 seconds is the absolute minimum, a more realistic value for this link would be in the range of 15 to 30 seconds to allow for other traffic.
/TRANSPORT=protocol-type
Network protocol used to transfer the data. The valid values are TCP and UDP (the default).
/UID=uid
Default UID, if no UID mapping exists for file access. The default value is -2. Requires OPER privileges.
/USER=username
Existing OpenVMS account to which the Client maps unknown UIDs. The default is the USER account. If the Client does not find the USER account, the DECNET account becomes the default. If the Client does not find the DECNET account, [200,200] becomes the default.
/VERSION (default)
/NOVERSION
Use the /NOVERSION qualifier to enforce a limit of one version on a file. This is a way of imposing an NFS file versioning scheme on OpenVMS files. /VERSION, allowing multiple versions, is the default. This qualifier is disabled if connected to a TCPware NFS server. (See Limiting File Versions.)
/WRITE (default)
/NOWRITE
Allows that you mount the filesystem either with write access (/WRITE) or read-only (/NOWRITE) on the local machine. If /NOWRITE, file creation, deletion, and other modifications are not allowed.
Examples
1 In
this example, the Client mounts the /usr filesystem from sigma onto the OpenVMS
mount point when it references the pathname. The Client keeps the path mounted
until the Client reaches an inactive period of 10 minutes, after which it unmounts
the pathname. Subsequent references cause the Client to remount the filesystem.
$ NFSMOUNT SIGMA "/usr" NFS0: /AUTOMOUNT=(INACTIVITY=00:10:00)
2 This example shows an overmount. The second mount specifies a lower level in the server path.
$ NFSMOUNT SIGMA "/usr" NFS1:[USERS.MNT]
%NFSMOUNT-S-MOUNTED, /usr mounted on _NFS1:[USERS.MNT]
$ NFSMOUNT SIGMA "/usr/users" NFS1:[USERS.MNT] /FORCE
%NFSMOUNT-S-REMOUNTED, _NFS1:[USERS.MNT] remounted as /usr/users on SIGMA
3 This example shows an occluded mount. The mount point specification is "backed up" one subdirectory on the second mount. Both mounts are visible in an NFSMOUNT/SHOW. However, if you do a directory listing on NFS2:[USERS.SMITH], the [MNT] directory is no longer visible. To make the directory visible again, dismount NFS2:[USERS.SMITH].
$ NFSMOUNT SIGMA "/usr" NFS2:[USERS.SMITH.MNT]
%NFSMOUNT-S-MOUNTED, /usr mounted on _NFS2:[USERS.SMITH.MNT]
$ NFSMOUNT SIGMA "/usr" NFS2:[USERS.SMITH] /FORCE
%NFSMOUNT-S-MOUNTED, /usr mounted on _NFS2:[USERS.SMITH]
-TCPWARE-I-OCCLUDED, previous contents of _NFS2:[USERS.SMITH] occluded
NFSMOUNT /CONFIG
Mounts one or more remote NFS directories based on information in a configuration file. In this way, you can maintain a regular list of server filesystems that you can automatically mount using one command.
DCL Format
$ NFSMOUNT /CONFIG=filespec
Parameter
filespec
OpenVMS file containing the configuration information. The contents of the file should include line entries in the format prescribed by the NFSMOUNT command:
server "nfs-path" mountpoint [logical] [qualifiers]
The configuration file must have complete information for a mount on each line (continuation lines are not allowed). The Client ignores blank or comment lines. Mount requests in the file can have further configuration file references, although there is limited nesting of these requests.
Qualifiers
Note! The Client uses qualifiers specified with the NFSMOUNT /CONFIG command as defaults for mount requests in the configuration file. However, qualifiers included with mount requests in the file override these defaults.
See the NFSMOUNT command for details on the following qualifiers:
/ACP_PARAMS=([BUFFER_LIMIT=limit-value]
[,DUMP]
[,IO_DIRECT=value]
[,IO_BUFFERED=value]
[,MAX_WORKSET=pages]
[,PAGE_FILE=filespec]
[,PRIORITY=base-priority]
[,WORKSET=pages])
/ADF=option
/NOADF
/AUTOMOUNT[=(INACTIVITY=inactive-time)]
/BACKGROUND[=(DELAY=delay-time,RETRY=retries)]
/CACHE_TIMEOUT[=([DIRECTORY=t][,ATTRIBUTE=t])]
/CONVERT={ STREAM_LF | STREAM_CRLF }
/NOCONVERT
/DATA=[(]read-bytes[,write-bytes][)]
/FILEIDS={UNIQUE | NONUNIQUE}
/FORCE
/NOFORCE
/GID=gid
/GROUP
/LABEL=volume-label
/LOCK
/NOLOCK
/LOOKUPS
/NOLOOKUPS
/OWNER_UIC=uic
/NFS=version
/PROCESSOR=keyword
/PROTECTION=protection-code
/RETRIES=max-retries
/SERVER_TYPE=server-type
/SHARE
/SUPERUSER=uid
/NOSUPERUSER
/SYSTEM
/TIMEOUT=timeout-period
/TRANSPORT=protocol-type
/UID=uid
/USER=username
/WRITE
/NOWRITE
Examples
1 The
following command consults the CONFIG_NFS.TXT file for mounting information.
$ NFSMOUNT /CONFIG=CONFIG_NFS.TXT
2 The following command also sets data size and username parameters (which can be overridden by qualifiers in the configuration file).
$ NFSMOUNT /CONFIG=CONFIG_NFS.TXT /DATA=512 /USER=BART
NFSMOUNT /SHOW
Displays the mounted directories at all mount points or at a particular mount point.
DCL Format
$ NFSMOUNT /SHOW [mountpoint | device:]
Parameters
mountpoint
Full NFS device name and directory tree for which to show mount information. For example:
NFS1:[USER.NOTES]
Alternately, you can use a logical name for the mount point.
device:
NFS device name part of the mountpoint parameter (such as NFS1:).
Alternately, you can use a logical name for the mount point. With the /ALL qualifier, the Client uses only the device portion of the logical name.
Qualifiers
/ALL
Shows mount information for all servers, or a specified server or NFS device.
/FULL
Displays the full, current operating parameters related to each mount.
See the NFSMOUNT command for descriptions of the qualifiers that correspond to each of the operating parameters.
/QUOTA
Displays quota information for the current user's mount. The qualifier used by itself shows four columns at the top of the display indicating the block usage, soft limit (quota), hard limit, and grace period.
Use /QUOTA with the /FULL qualifier to show four additional columns indicating any possible file quotas. These show as zeros for an OpenVMS system but as actual values for UNIX systems that support file quotas.
Use /QUOTA with the /USER qualifier to request quotas for other than the default user.
/USER=username
Use with /QUOTA to show quotas for a specific user. This requires the mount to have been performed using the /SUPERVISOR qualifier, which maps users with SYSPRV, BYPASS, or READALL privileges to the superuser UID. /USER requires SYSPRV or GRPPRV privileges.
Examples
1 This
example provides the default command display.
$ NFSMOUNT /SHOW
_NFS1:[000000] automount (inactivity timer 0 00:23:00.00), mounted
SIGMA.GREEK.COM:/usr
_NFS2:[000000] mounted
IRIS.PLANTS.COM:/usr/users
2 This example shows characteristics of all mounts on a specific NFS device.
$ NFSMOUNT /SHOW NFS0: /ALL
_NFS1:[A.B] mounted
SIGMA.GREEK.COM:/usr
_NFS2:[A.C] mounted
SIGMA.GREEK.COM:/work
3 This example shows the full mount display with all operating parameters for a specific NFS device. Note that you can either enable or disable Writing and Write conversion.
$ NFSMOUNT /SHOW NFS1: /FULL
_NFS1:[000000] mounted
MERAK.GREEK.COM:/eng/nfsuser
Transport UDP Writing Enabled
Read/write size 8192/8192 Write conversion Disabled
RPC timeout 0 00:00:01.00 ADF usage USE,UPDATE,CREATE
RPC retry limit 0 Fileids Unique, Nolookups
Attribute time 0 00:00:15.00 Server type TCPware, NFSv2
Directory time 0 00:00:30.00 Advisory Locking Disabled
Cache Validation MODIFY TIME Default user [USER]
Superuser No Default UID,GID 100,15
4 This example shows the additional full block and file quotas for the user's mount.
$ NFSMOUNT /SHOW NFS2: /QUOTA /FULL
_NFS2:[000000] mounted
viola:/pctest
Disk Quotas for user [SMITH]: (inactive)
Blocks Quota Limit Grace Files Quota Limit Grace
117355 500000 600000 0 0 0
Transport UDP Writing Enabled
Read/write size 8192/8192 Write conversion Disabled
RPC timeout 0 00:00:01.00 ADF usage USE,UPDATE,CREATE
RPC retry limit 0 Fileids Unique, Nolookups
Attribute time 0 00:00:15.00 Server type TCPware, NFSv2
Directory time 0 00:00:30.00 Advisory Locking Disabled
Cache Validation MODIFY TIME Default user [USER]
Superuser No Default UID,GID 100,15
NFSDISMOUNT
Dismounts an NFS mount point from the local device and directory structure.
DCL Format
$ NFSDISMOUNT [mountpoint | device:]
Parameters
mountpoint
Full NFS device name and directory tree to dismount. For example:
NFS1:[USER.NOTES]
You can also use a logical name for the mount point. At the end of the NFSDISMOUNT operation, the Client deletes the logical name from the job logical name table.
device:
NFS device name part of the mountpoint parameter (such as NFS1:). You can use the device: alone only with the /ALL qualifier.
Alternately, you can use a logical name for the device specification. TCPware considers only the NFS device part of the logical name.
Qualifiers
/ALL
Dismounts all filesystems from all servers, or a specified server or NFS device. The following options are available:
|
NFSDISMOUNT /ALL |
Dismounts all filesystems from all servers |
|
NFSDISMOUNT /ALL /HOST=server |
Dismounts all filesystems on the specified server. (See the /HOST qualifier below.) |
|
NFSDISMOUNT device: /ALL |
Dismounts all filesystems on the specified device (such as NFS1:). |
Note! Dismounting a /SYSTEM mount requires SYSNAM privilege. Dismounting a /GROUP mount requires GRPNAM privilege.
/HOST=server
When used with the /ALL qualifier, dismounts all filesystems from
the specified server. The
/HOST qualifier is otherwise meaningless.
/WAIT
/NOWAIT (default)
Specifies whether or not to dismount the mounted filesystem if there are still outstanding activities.
With /WAIT, the command waits until the Client completes the dismount. If you try to open any files on the mount point, the dismount fails.
With /NOWAIT, the Client completes the command immediately. However, the dismount does not actually occur until all file activity has completed.
Examples
1 This example dismounts the specified mount point only. The Client dismounts only [USR.MNT] and no other mount in the directory structure of the NFS3: device.
$ NFSDISMOUNT NFS3:[USR.MNT]
2 This example dismounts the NFS1:[000000] mount point and waits for it to occur.
$ NFSDISMOUNT NFS1: /WAIT
3 This example dismounts all mount points on all devices.
$ NFSDISMOUNT /ALL
4 This example dismounts all mount points served by host SIGMA.
$ NFSDISMOUNT /ALL /HOST=SIGMA